Search This Blog

Showing posts with label ranger stickles. Show all posts

Tuesday, July 8, 2014

Vintage Ring Box

Hi friends! I'm stopping in today with a quick post before I have to get dinner on the table and then hopefully some scrappy time later this evening. The community that we live in in Southeast Portland is pretty awesome! We have a community garden, basketball court, our own laundry facilities and a 'free' donation space near it. We are still living in an apartment but it's much bigger and more renovated than our old place. The best part is the neighborhood and how small it is- only 12 units total. So I was rummaging through the 
free pile the other day and I found a cute little all wood ring box. It was kinda dirty on top, but I decided I could do something with it!

I sanded the top first, then I modge podged some paper to it and some other little things, one of them is a boquet charm I made for my wedding day with a vintage picture of my mom. I wanted to add that so that everytime I put something in or take something out of the box, I could see her face. I sure do miss her, can't believe it has been 18 years. I sure don't feel 18 years older.

Here are some photos:


a close up of the buttons, pearls, and rose I added to the top.


My favorite part is the little saying it has on the front I really like how it turned out and I am keeping it on a side table near where I always sit at the end of the day. It was fun making this into something cute with something I got for free!!

Well, it's time to help hubby finish up dinner, eat good, then maybe some scrap time. I am mid-way through a layout I started a few days ago for the Punky Scraps Challenge. I hope I still have time to finish and submit it!! Here's to a glass of iced tea, some good tunes, and studio time :) hoping you get yours in this week too! until next time yall~ peace VV

Tuesday, June 24, 2014

Steampunk Bird Card :)


Hi blogland friends! I am stopping in for a quick post today to share a card I did yesterday morning for my sister. I have a care package I'm sending to her with her wall hanging for her classroom, a card, and some other goodies. I love putting together a box to send. The excitement of getting real mail, especially a box, will always entertain me!

I used a blank card I already had and covered it with scrap paper, then I stamped by steampunk bird stamp by Deep Red Stamps and colored him in using distress markers and stickles. I love how it turned out!


I added a chipboard circle and some enamel dots then washi tape and my alphas. I hope my sis likes it. I can't wait for her to open her box!!


Until next time, I hope you have a crafty day! I'm off to the bank, post office, and goodwill, then iced coffee and studio time ;)


Tuesday, May 13, 2014

Sandy's Cards


Hi blogland buddies! I hope you enjoyed your weekend. I only had Sunday off but hubby & I sure made the most of it. Went out to lunch, then shopping and coffee on Hawthorne, then an evening walk about 2.5 miles...then home for dinner & a movie all in all yesterday was a pretty good day. I am back at work today, but I wanted to share some pics of a few little things Ive been working on latley. First up are a few mother's day cards that hubby helped me make for his mom. I did mail them out late but at least they are on their way to her!

Here is my card:


I recycled some old stationary that has my maiden name printed on it, I think I have had these since senior year of high school! They are just plain white but I rather like the embossed /framed looking edge so I decided to work with that and just cut my paper to fit the middle. I am really happy with how it turned out and after I added the 'countertop' it looks more realistic too! I also decorated the envelope.

I let my hubby decorate a card I've had in my stash for a while and it was easy, all he had to do was add stickles, which was fun to watch him do! He added his msg to the inside and I got them popped in the mail..


I have lots of new projects in the works for this month,  custom guest book for my best friends wedding, 2 wood canvases, and of course more scrapboooking! I am hoping to spend most of this afternoon crafting after I run up the the grocery store and finish cleaning the house. Its my last day off until Sunday so I've got to make the most of it! Unti l next time scrappy friends, peace y'all!

Sunday, February 9, 2014

SOS & Susan's Monday Challenge

Hi friends! I hope you are ready for Valentine's day! I am sharing a layout I did this week for the Sketch Challenge over at Scrap Our Stash. Frosted Designs is sponsoring this month and so the design team got to play along! It was pretty easy to put together the pink & red color palette but I added a bit of mint and black to pump up the volume. I had so much fun making this layout and using a old photo from my stash of me, my mom, sis, cousin and aunt on Easter 1989.

 I am also entering this for the Monday Challenge over at my friend Susan's blog: Where Life Meets Art...her challenge this week is to use red & pink on your layout. I originally wanted to do some cards but with the crazy weather here and my work scehdule not really changing...unfortunatley thats how retail is sometimes, I didn't have time. I am still really happy with this project and no harm in sharing it!

Here is the sketch:

The other requirements of this challenge were to use heart patterned paper, at least one premade heart embellishment, and at least one premade arrow.

Here is my layout:

I used several items from the Frosted Designs store:
Ranger Dylusions Ink white linen
Black arrows paper- Carte Bella Wildflower collection
Maya Road emphemra 'love' and heart
stickles glitter glue champagne, fruit punch & cranberry
Studio calico that-away stickers
memory photo frames

And here are some close ups for you:


I really enjoyed sharing today. It was pretty cold, snowy and icy here last week and I hope you got to see some of my snow pictures. It is starting to slightly warm up and I think everyone is looking forward to spring! Until next time friends- enjoy your weekend & great creative! You still have plenty of time to join in both challenges!


Tuesday, January 14, 2014

Word of the Year! my first venture into art journaling..

Hi everyone! I am very excited to be here today to share my very first ever art journal page! I have been influenced, awed, and inspired by fellow Frosted Designs team member, Sandee to take a leap of faith and try it out! I had no idea how much fun it would be! If you haven't been following her Sundays with Sandee series on the Frosted Designs blog, you should stop what you're doing and go check out some of her videos right now!! You can find them all here: http://frosteddesigns.blogspot.com/p/sundays-with-sandee.html

So one of the posts that really inspired me was her 'word of the year' page. I spent several days researching this new idea of using one word for your new year's resolution instead of a list of several things. Obviously, its alot simpler and easier to remember, but it's more than that. After much thinking, I tried to pick a word that would help me in every aspect of my life, health wise, work wise, etc. When I ask myself about a decision Im about to make I will use this word to help me make the right decision. The word I chose is THRIVE.

I think it's a perfect fit for what I want to accomplish this year. I want to get healthier, become more active, advance in my career, and accomplish more creatively. I want to stand up for my life, and do what's best for me and my husband, instead of taking on tasks or volunteering for things when I could have better spent my time doing something else.I want to ultimatley look back on this year in 2015 and say that it was a time of determination and strength for me to push forward to something better. I think so far it hasnt been too bad of a start. Yesterday was the perfect kick-off to what i hope will be a better routine for Jimmy and I.

Ok, enough chat, now to share some pics of my page. The first thing I did was take some gesso with a mask I have (not sure the brand) and put it over several parts of my page. As you will see, thru pencil drawings, water misting, and using my gelatos it created kind of a 'resist' effect which was a happy accident. I was expecting to be able to color over it and was really only using it for the texture. This is a photo of the first step, after I gesso'd then drew my base which was a 'rock wall. Originally I was going to make it solid but in hand drawing all the stones I found a natural place where a hole should go so I added it.


The next photo is after I colored in the rock wall using some gelatos, grey and yellow, misted over with water, smudged with my fingers, and then dried it. I also took out some of my grungeboard letters in this step and started to figure out placement.


The last picture I took before the finishing touches was when I began to draw in the vines. I drew them in with pencil, then used several gelly roll pens to re trace them in the later step. I also had already glued down my letters that were colored with gelatos then inked over with Tim Holtz distress stain in vintage photo. The sun behind the wall is also pencil drawn then colored using sharpies, then gelatos blended in.


And this is the finished product. I added the 2014 in grungeboard letters at the bottom which I covered in Dylusions spray white linen and stickles in Tiara. The quote off to the side is from a song and I did some more journaling in very small letters on the tails of my hearts. Mostly affirmations to myself about the individual ways I want to THRIVE in 2014.


Thank you so much for stopping by today. I really love reading all your blogs and getting comments. I hope to give you some bloggy love soon! Maybe later today after I tackle this laundry pile and go for our walk. Then it's back to the studio for more creative time!!!! I hope you have a great week & can get some creative therapy time in for yourself. Peace~ VV

Supply List from the Frosted Designs store: Ranger Dylusions Ink Spray - melted chocolate, Ranger Dylusions Creative Journal, Faber Castel Gesso, Faber Castel 50's Diner gelatos, water brush, Gelly roll pens

Other: Stickles 'tiara' Tim Holtz grunge board letters, Tim Holtz distress stain 'vintage photo' epoxy heart stickers, bird stamp from stash, Tim Holtz distress markers-bundled sage, spun sugar, broken china, antique linen, pencil

Wednesday, October 9, 2013

Tim Holtz 12 Tags of 2013: October


Good evenin' friends. I can't believe October is here. This is my favorite month of the year, no  on my because it's our anniversary month, but lots of other favorite things, pumpkin spiced lattes, leaves changing ( gotta get some  goo  pics of those soon they are gorgeous right now!!) Football, the crisp air, and all things Halloween- including movie marathons and candy corn!! Hocus Pocus is my favorite:) it's also especially exciting this year because  I get to experience my first true seasonal change in Oregon.

I am stopping by today to share my version of Tim's tag for October. I always try to challenge myself to use the supplies I have on hand, and for this tag it was especially hard, I have been wanting some of the new seasonal release stamps and dies for a while, alas I still don't own a vagabond so I had to make do. I did have some blank grungeboard, and son  of the distress ink colors he used. For everything else I had to think outside the box! That's why these challenges are so awesome. I can't wait to get my hands on some  real distress glitter though! This was our inspiration, Tim's fabulous tag:


Here's the first tag: (again excuse my photos I haven't gotten used to editing on this tablet yet:/ )


I started my tag by using some of the distress inks on my makeshift nonstick Kraft mat- I used dusty concord, scattered straw, and spiced marmalade. I then wet the surface of my #8 tag before swiping it thru the inks like Tim does. I was really pleased with how the background turned out after a couple of tries. I then went around the edges with a ink blending tool loaded up with black soot for a nice border.


After that, I cut out a few squares of grungeboard and put a black cat and moon sticker from an old creative memories pack, then edged it in black soot, and went over it good with embossing powder and UTEE then heat set it. I led it heat for a while, it made some of the parts bubble up a bit. I also had some frames leftover from another Halloween pack that I glittered and pop dotted up around the cat. I added some black star blingys and tulle and ribbon to finish it off. 

For the second tag, I inked the background directly from the ink pad, then used a distress marker in bundled sage and blended with water. After that I added the pumpkin sticker to the bottom and drew around them with a sharpie. I had another grungeboard moon that I cut out, stamped around and started adding in other embellishments.


I had fun with some old epoxy stickers, glossy accents, and stickles in copper and black diamond. I haven't used these in a while so it was fun to doodle around the moon. This  is a smaller Kraft tag so I used mess ribbon and some staples to finish it off. 


Here are a few shots of both tags:)


Thanks so much for stopping by tonight. I have been so busy lately with work.stuff that creative time has really been on the backburner. But with the colder weather on its way, and more days inside on the horizon, I feel.like the mojo is coming back. I am so looking forward to next weekend...it's our 1 year wedding anniversary and we have a mini road trip.planned and some other fun stuff:) I hope to get some  good pictures!!


Wednesday, April 3, 2013

Tim Holtz: 12 Tags of 2013: April

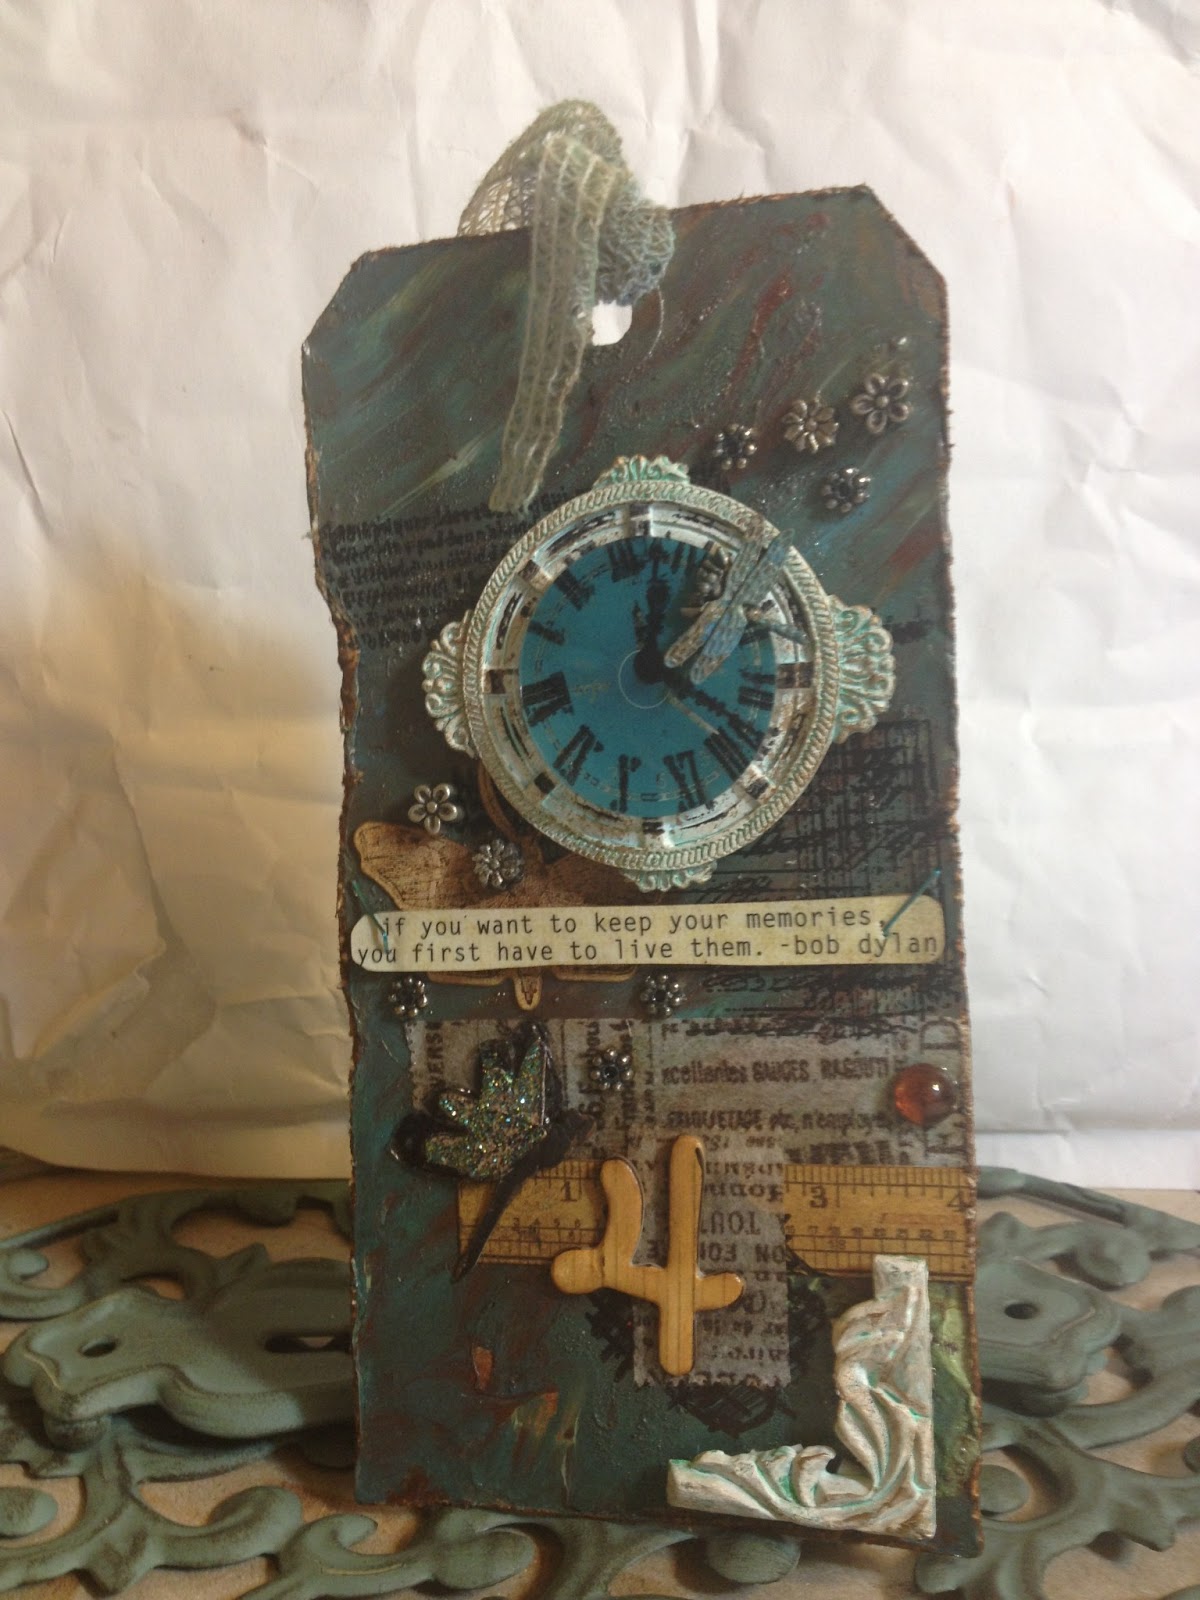
So I was so EAGER to get started on t!m's tag for April that I stayed up late last night and finished it, after it's only been posted for 24 hours on his blog. Me thinks I might be a wee bit obsessed...oh well it's always great to start a new month off right with new challenges and some fresh inspiration. I was really in love with the whole 'patina' technique' he did on this tag and I did my best to replicate it. Sadly, I don't have any of the new distress paints- which I am DYING to get my hands on soon- so I had to make do. This is what Tim's Tag looks like as our fabulous inspiration:


Well I knew I didn't have any of the distress paints, or metal pieces. I had some other metal pieces including a mini dragonfly that I found so I first pulled out all my supplies. I had the #8 manila tag, distress inks, tissue tape and crinkle ribbon. I actually experimented by using some folk art craft paint that I mixed together and also spritzed with water to get my background effect. Then I heated everything to dry and started laying on the elements.

I used some Hampton Art stamps on my background along with tissue tape and a few stickers from Tim's crowded attic collection. Then I added on my patina clock and corner piece. The clock is layered with a clear piece that I stamped and the metal dragonfly, then inked all over with distress ink.

 And a few more shots, some close ups!


 And my favorite, instagram shares!


Thanks so much for stopping by my blog today! I love getting comments and new followers. I need to get to work but I will be sharing up more inspiration and new challenges for what's going on in April! Have a great Wednesday everyone, until next time~ Peace Y'all~ VV

Supplies Used:
Folk Art craft paint- teal, baby blue, bronze, pine green, gold metallic
#8 Manila tag
Tim's paper distresser
Tim's distress ink- walnut stain, vintage photo, tea dye
Tim's tissue tape
Tim's crowded attic stickers
mini stapler
sticker quote from stash
metal flowers,dragonfly and #4 from stash/Thickers
Ranger stickles in Patina
gem drops by The Robin's Nest
mesh ribbon from stash
distress ink in Salty Ocean
Hampton Art script stamps
Archival ink in Jet Black