Search This Blog

Showing posts with label basic grey ambrosia. Show all posts

Tuesday, February 26, 2013

Frosted Designs: BE BOLD Challenge!

So as a brand new member of the FD Design Team, I thought I would go ahead and play along with the challenge this month just for fun, to get my mojo going on DT projects in the next few weeks. I have been feeling like crap since I got back from California on Saturday night, but after a Dr visit today, some antibiotics and meds, I am starting to feel slightly better. Good thing because I have deadlines! I really needed an extra day to recoup so I called in sick today....for the first time in like a year!!! It was really difficult for me to do, seeing as how I know how much work I'll have piled up when I get back, just woke up with a hacking cough and headache and well I broke down and called in. So today after the Dr and picking up prescriptions, I had a chance to take a photo of an LO I did before I left for Cali to share it with you. The challenge this time was to "use bold colors and patterns on any project or layout". I LOVE LOVE LOVE the fact that all the challenges FD does asks you to use materials you already have, then gives you a jumping off point! I knew I had some vintage Basic Grey papers hiding deep in my stash that I have been saving for specific photos...although at the time I wasn't sure what. I dug them out, and then found these photos from last summer at the Hangout Music Fest and I was instantly inspired! Here is how it turned out:


 I used my Cricut to cut out a few embellishments, the 'hang ten' hands and the surfboard are from the Life's A Beach cartridge. I also used my black/white camera and black filmstrip washi tape. The letters are Thickers and all 3 papers are from the Basic Grey Ambrosia line.


And a few more snaps that I shared on instagram to all my followers today:


Ok, well it's short and sweet for tonite! I have to get back in the scrap room and finish up the next challenge for FD which will be shared on the blog very soon, stay tuned for some wonderful inspiration from our team. I have linked all their blogs on my sidebar, check them out! Until next time, Peace Y'all~ VV

Supplies Used:
Basic Grey vintage- 'Ambrosia' collection
cream and grey cardstock
Tim Holtz distress ink- barn door, antique linen and black soot
Tim Holtz distress embossing powder black soot
Tim Holtz vial labels
Tim Holtz paper distressing tool
Thickers- alphas
Top Boss embossing ink
Ultra thick embossing enamel UTEE
swirl stamp- recollections
camera and film strip washi tape- recollections
flowers- Prima
Cricut Life's A Beach cartridge
dew drops by The Robins' Nest
sentiment sticker- my stash


Sunday, July 15, 2012

{Inner Beauty} July Sketch at HBS

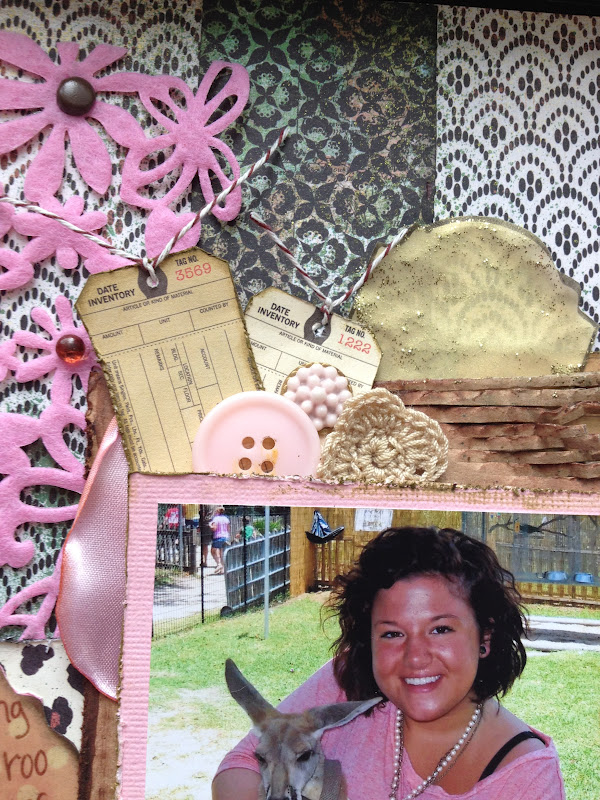
Good afternoon friends! I am here today to share another non-DT layout I did late last night, I had caught the creative bug after going to our meeting at my LSS, Scrapping Frenzy. We were supposed to crop afterwards but everyone was pretty tired except me! So I came home and unpacked and got organized for my next few weeks of submissions, and decided to finish the LO that I started at the store. I am really, really happy with the way it turned out. I was inspired once again by a fellow DT member, Suzanne, who is the master of layering on her LO's!!! She puts everything under the sun on her pages...lace, freezer paper, cardboard, burlap, cheesecloth...LOL! Well I went digging through my stash and found a few things to layer, and I really wanted to brighten up this green/brown/black paper so I added some pinks in, to tye in my photo of my cousin Kate. I used the July Sketch that's up over at Handmade by Suzanne, my first submission for their challenges, but the winner gets a $40 voucher!! WHOO HOO!! Let's hope I win, there are sooo many awesome pages in their gallery!! Here is the sketch:

And this is how my LO turned out:


I decided to try my hand at a little layering of materials again. I used cardboard, several patterned papers, a shipping tag, a felt border, some satin material from a flower I took apart, buttons, and of course other yummy stuff. I have been holding onto some of these Basic Grey papers for a while, and I liked mixing them together, but I wanted to tie in the pink like her shirt in the photo, so I added the border and went from there! I really like how the unexpected color palette of browns, greens, blacks and cream mix with the light pinks! Perfect for the photo :D Here are a few close ups:


So that's all for me today. I hope you had a great weekend... I had to work but I also got a free day and was able to fit in a little 'relaxtion' time with friends which is always good for the soul, so I'm feeling great heading into the start of this week! I'll be back again soon to share another sketch challenge and maybe a wedding craft or two :D Until next time, Peace y'all~VV

Supplies Used:
pink cardstock-Bazzil
Echo Park 6x6 mini papers 'Note to Self'
leopard print paper- The Paper Studio
Basic Grey- Ambrosia 'Quince'
Basic Grey-Out of Print 'Odds 'n Ends'
pink felt flower border- Queen & Co
manila shipping tag
brown baker's twine- Queen & Co
pink and gold pearls- Michael's
Thicker's brown foam alphas
dew drops by The Robin's Nest
small circle, resin embellishment, silk piece, cardboard, vintage buttons, flowers, and brads- mystash
fabric button- Purple Pumpkin Crafts
Ranger Stickles in gold
Tim Holtz distress stickles - peeled paint
Colorbox cat's eye inks in chestnut, dark brown, black, and dark moss
Smooch Spritz by Clearsnap in 'emerald sprinkle'
brown ZIG marker
Tim Holtz distress marker in 'picket fence'


Friday, July 6, 2012

I {ADORE} this girl...

Good morning! I am super excited that I have another share for you today and even more excited that it is non-DT related!! Which means I got some EXTRA scrapping time in this month, which is great!!! I have been holding on to this pic of my little niece for a long time, she's a bigger now, but something about it just struck me, I knew I needed to do a special page using it! And I decided to print it in black and white to add even more drama...my favorite part is the expression on her little face...it's priceless!!! 
Ok, here are the pictures:


I actually used the cardboard/paper packaging from a pack of Prima flowers to put behind my matted photo.  It had such a cool design with the script and the clocks that I thought it would be worth saving!! 


I also made a bow using some black tulle and white meshy stuff. I also wanted more or less a monochromatic color scheme so I stuck with black, white, greys, and shades of orange/peach to make sure that the photo was the star of the page!
 And the last close up, my favorite and only little niece, Zoe!!! I love her!!

Okay, well short and sweet today. I hope you enjoy your weekend! I will be working the whole time but I'll be off again Tues and Wed and then it will be back to some creative time!! Until next time, peace y'all~VV

Supplies List:
Basic Grey 'Ambrosia' collection "marmalade"
cream/black script background paper-unknown
black shiny damask paper-DCWV wedding collection
black tulle, white mesh, seersucker fabric, vintage buttons-my stash
Tim Holtz paper distresser
Tim Holtz distress stickles 'dried marigold'
Clearsnap Smooch Spritz 'silver foil'
Clearsnap Colorbox cat's eye inks 'butterscotch'
grey and peach roses by Recollections
decorative music tape by Recollections
Ranger stickles 'black diamond'
Princess Petals florettes by Webster's Pages (tulle flower)
black glitter stick-on border by Studio G