Search This Blog

Showing posts with label vintage buttons. Show all posts

Monday, October 6, 2014

Quick Card Share & welcome October


Hi friends!! It's been entirely too long since I've updated here. Life has been hectic to say the least! I got a big promotion at work and with me transferring stores I've got a much longer commute- which means less crafty time at night & earlier mornings. I'm happy where I'm at and I know it's a move in the right direction for us financially. We are still hoping to buy our first home the end of next year if all goes well.

A few weeks ago i made this birthday card for a co-worker of mine, Nina. She loved it! I am really happy with how it turned out considering it only took me 35 mins in the mornjng before work. I used a pre-made tag from scrsp convention a few years ago. I added some more flowers and buttons, vintsge of course. I love sharing art i have made with other people, especially for their special day.Here are a few pics:


Well, that is about all for today! I'm off to finish my Halloween decor and msybe start on Tim's Tags for 2014... yep im almost a year behind! I might skip around and just do the October one. I hsve so many projects i want to start, just less time now to do them.

Hope you have a great week! Check back tomorrow for more inspiration.. i promise to not be away for so long again!!

Tuesday, July 8, 2014

Vintage Ring Box

Hi friends! I'm stopping in today with a quick post before I have to get dinner on the table and then hopefully some scrappy time later this evening. The community that we live in in Southeast Portland is pretty awesome! We have a community garden, basketball court, our own laundry facilities and a 'free' donation space near it. We are still living in an apartment but it's much bigger and more renovated than our old place. The best part is the neighborhood and how small it is- only 12 units total. So I was rummaging through the 
free pile the other day and I found a cute little all wood ring box. It was kinda dirty on top, but I decided I could do something with it!

I sanded the top first, then I modge podged some paper to it and some other little things, one of them is a boquet charm I made for my wedding day with a vintage picture of my mom. I wanted to add that so that everytime I put something in or take something out of the box, I could see her face. I sure do miss her, can't believe it has been 18 years. I sure don't feel 18 years older.

Here are some photos:


a close up of the buttons, pearls, and rose I added to the top.


My favorite part is the little saying it has on the front I really like how it turned out and I am keeping it on a side table near where I always sit at the end of the day. It was fun making this into something cute with something I got for free!!

Well, it's time to help hubby finish up dinner, eat good, then maybe some scrap time. I am mid-way through a layout I started a few days ago for the Punky Scraps Challenge. I hope I still have time to finish and submit it!! Here's to a glass of iced tea, some good tunes, and studio time :) hoping you get yours in this week too! until next time yall~ peace VV

Tuesday, June 17, 2014

Classroom Wall Hanging

Hi friends! I hope you are having a fabulous day! I know things have been pretty good here, I just love summertime and I have been really trying to allow myself more and more time to create on my off days. It really feeds my soul and helps me zone out from stress- work stress, money stress, etc. It's my own little place in the world where I can be for hours by myself and come out feeling like I'm in a much better mood than before.

Today I am sharing a wall hanging I did for my sister's classroom. She just recieved her graduate degree in English Literature Education from the University of Alabama. She was an undergrad at Birmingham Southern before that, and even though she is my younger sister, I really look up to her in so many ways. This will be her first year teaching and along with helping her build a classroom library, I wanted to make her a little something special. She and her hubby were visiting me in Portland back at the end of March for Spring Break and we went to Powell's Books of course...famous bookstore one entire city block! I found this quote on a card and it inspired me, I thought I could take that quote and do something with it.


So I started off with a piece of scrapwood from Hubby's work, I did a thin layer of gesso over it first. Then I started laying down some paper pieces with modge podge. I used alot of pieces from a Tim Holtz set that looked like an old book page, an old library card, and layered them. I did another layer of modgepodge.

Then I went to work making the 'girl' I traced the shape of a girl I had from scrapbook paper, then seperatley cut out her dress and hair with different paper. I glued them together then went over them with a marker and then a white gelly roll pen for the polka dots on her dress. I used some mini pearls for her earrings, braclet and barette. I went back over her hair with a few different markers, then I let her dry. 


After she was dry I cut out some random scrap pieces for 'books' and I had to redraw her hand from the original pose to make it look more realistic. I modge podged her to the right side of the wood and then finished coloring in the lamppost and sign.

For the finishing touches, I used a piece of metal tape for one side of the lamp post and I went back over it several times with a wet brush and  a black gelato. I also glued down one of my vintage trinkets from prima- the lightbulb!  Last I laid down the letters. A mix of glitter thickers that I went over with Tim Holtz distress ink in barn door, and sticker letters that I traced with a white gelly roll pen. I went back with more stickles in christmas red and copper, then added a few enamel dots. I went back over the white areas with another coat of gesso just to make the image look cleaner, then heated well to dry! 


Well that's about it for today. I hope you have enjoyed my share. It took me several evenings to get it done but I am very pleased with the outcome and I'm off to mail it to my sis tomorrow morning!! I have several more ideas and projects in the works...I hope to be able to share them with you soon! I am looking forward to more creative time this week in between work, cooking, cleaning, and walks with hubby. Enjoy your week & until next time, Peace Yall~

Tuesday, May 20, 2014

Vintage Travel Guestbook


So I'm getting really excited about heading back down south in 2 weeks for my best friend's wedding in New Orleans. It will be a nice break from work, I will be able to enjoy staying in NOLA for 3 days,and then home to Mobile to catch up with friends and fam for 4 days. I can't wait to see everyone!! It will be one of the first times I've traveled by myself, I mean I have flown plenty of times but usually had to keep up with a group (for work trips) or had Jimmy with me. Not that I'm scared or anything, but it will be a new experience for me.

I volunteered to make her a custom guest book for the wedding and I came up with a pretty good idea. I bought a cream-canvas covered Heidi Swapp album about 8x6 and decorated the outside, then made some inside pages that guests can add to. It will be set up next to the photo booth and guests can add pictures and write a message using jars of washi tape and pens! I haven't found the right jars yet but I did finally finish the book and the little sign with 'instructions'. Here are some pics....


And a few closies of the embellshments I used. I used alot of paper from a K&Co travel stack that had these cool stamps. I cut them out individually, inked them with TH Vintage photo, and then heat embossed them. After I had the placement right I added vintage buttons from my stash, flowers, and some cut enamel brads. 


Elephants are a central theme for the wedding too, since it's at the Audobon Zoo and also the wedding logo is elephants. I tried to encorporate that on the front cover as well as using all stamps from places that are part of H &J's story...Mexico, Alabama,  Texas, &  Louisiana.


Here are a few pictures of the inside pages I did for guests to add pictures and write on!


Next is a cute little frame that I found (along with the one used on the front cover). In the dollar$ bin at Michael's...All that's left is to distress it and add the 'instructions' for guests. Also I am letting the Bride-to-Be decide what pic she wants on the front cover!

This is what the mini frame looked like before:


And after! I 'distressed' the detail work with TH ink in vintage photo and some of my Faber Castel Gelatos in gold using a wetted brush, then added the flowers and brad at the bottom.


Here's the 'instruction' part:


And inside the front cover:


Last page of the book,


I had so much fun making this little interactive album that I hope once I bring it down there for the wedding some of my other friends may want one...I could see myself doing any theme. Its basically a scrapbook for the photo booth pics! All that's left to do now is make the jars and buy some washi tape and paint pens in the right colors. I really enjoyed sharing this with you today & love reading your comments...have a great week!

Until Next time~ VV

Thursday, December 12, 2013

Bama Girls...are wild at Heart


Hi friends!! This is Katie and I am back again today to share a layout I did using the new 'Wildower' range by Carta Bella. I love  this line, the Aztec-influence patterns are so hot right now coupled with some pretty florals and woodgrains, this line so versatile! If you haven't had a chance yet to check out some of the new store items...go now and make you Christmas list!! Here's the  link: http://frosted-designs.com

I started my page by using some poppy colored cardstock to ground my photos and another strip of the patterned paper over the floral. Then I cut off all the mini strips that come on the bottoms of the pages an  glued those down as accents. This is what it looked like before I embellished:


After that I had fun embellishing with some of the stickers that came with the pack, along with a mix of wood veneer hearts that I colored, flowers, buttons, and ribbon.

 For my title, I mixed a bunch of different thickers and alphas.


I love the love you wild, love you dearly block cut from.one of the papers.


I hope you enjoyed my share today! I had a lot of fun making it and can't wait to play more with this range. You can find the supplies I used at the Frosted Designs store! Have a great week! Until next time scrappy friends-VV

Saturday, March 2, 2013

Frosted Designs Fabulous Friday Challenge: Chevrons!


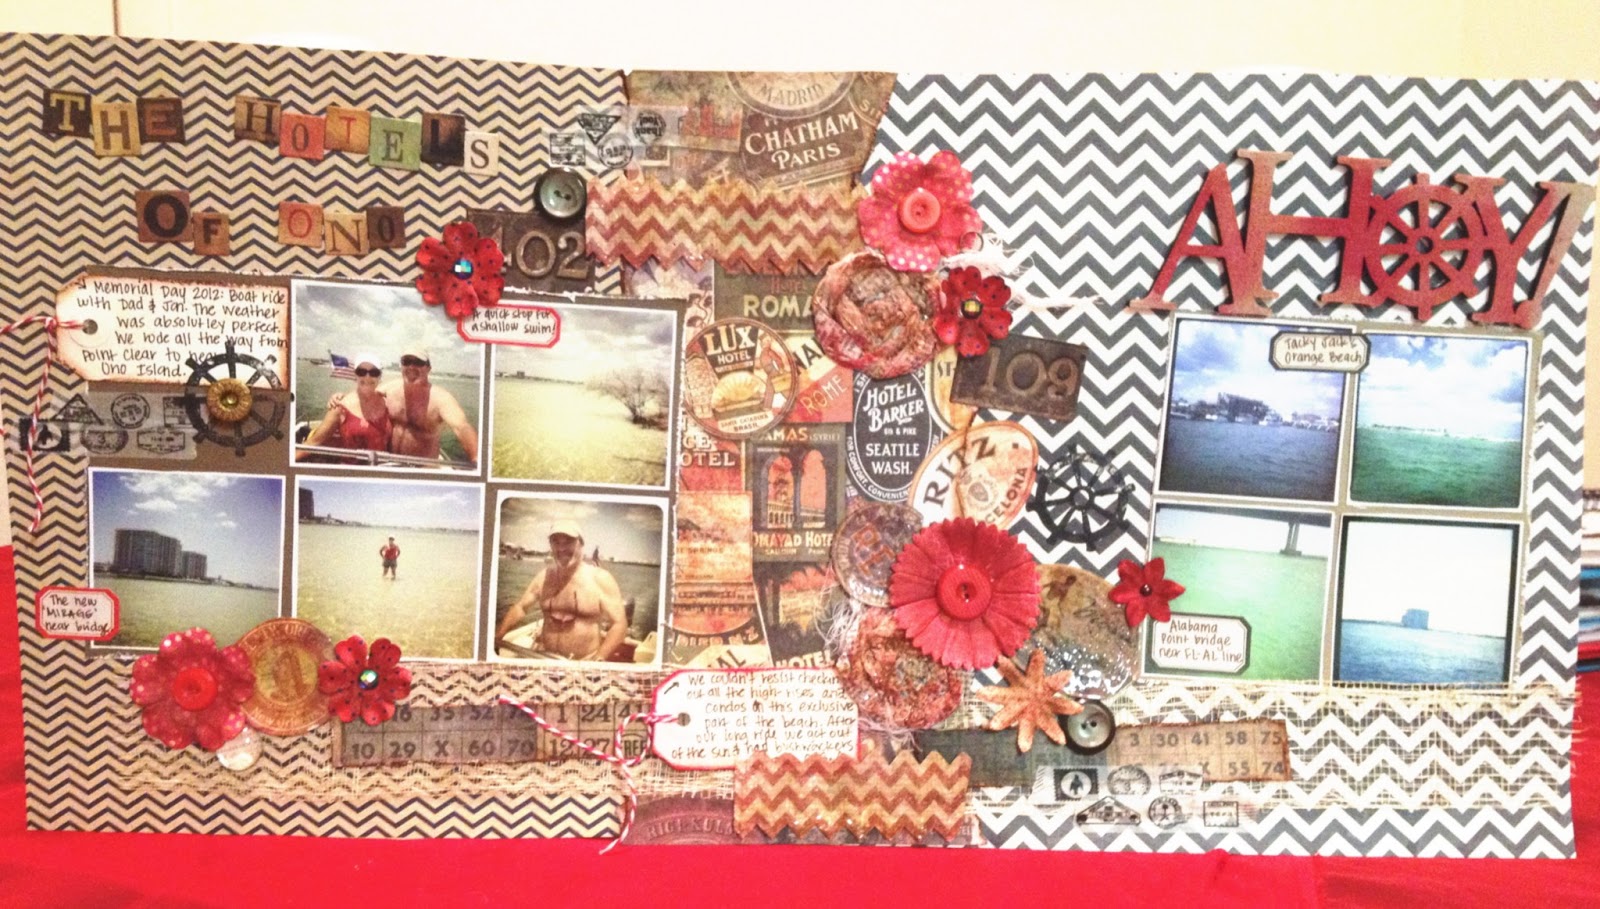
So today I am here to share with you my very first 'official' DT work as part of the Frosted Designs team! I am so excited that our first Fabulous Friday challenge was Chevrons..I absolutley LOVE chevrons! My iphone cover is even chevron!! LOL! Well anyway, the challenge was to use chevrons in any way, shape or form on your layout, card, or other project. This time I chose to actually do a 2 page layout- which isn't what I normally do but I was so inspired by some photos of my parents out on the Boston Whaler last Memorial Day that I knew I had to include them all! Please come check out all the inspiration over at Frosted Designs...all the ladies are so talented!!! Join in on the challenge today and be eligible to win the fabulous prize from our sponsor, "Leave a Paper Trail"! Here are a few shots of my project:


And a few close ups, my favorite part! The clusters of stuff, and different textures all together!


 I combined paper from American Crafts, Pebbles, and the Tim Holtz Lost & Found paper stash.
 The tile letters are Tim Holtz, along with the number stickers, memo pens, vial labels, and other paper scraps, some that I cut out and heat embossed others that I distressed and inked in vintage photo.

The 'hotel' paper from the TH paper stash was my starting point... I thought it was really cool and didn't want to cover to much of it up, so I decided to do 2 different chevrons on either side then ground my photos on solid cardstock in kraft and a darker brown color. 


Another fun thing I did on this layout was make these rosettes with script-printed tissue paper using some 'glubers' those things are so awesome! It was the first time taking them out of the package, basically they are a huge glue dot that you can make your own flower on. Then I spritzed them with Smooch in Cherry Ice and Tea Party, then over top of that some TH distress stickles in dried apricot. I heated them a tiny bit to dry then stuck them in place!

That's all for today friends! Thank you for stopping by, and if you aren't already a follower, I'd love it if you'd follow me on Google+ or facebook at www.facebook.com/vvcrafts. Until next time, Peace Y'all~ VV


Supplies Used (partial list):
Tim Holtz Lost&Found paper stash-hotel paper
Tim Holtz element stickers, memo pens, tile letters, vial labels
Tim Holtz distress stickles - dried apricot
American Crafts- red and navy chevron papers
kraft and dark brown cardstock-Bazzil
wooden title- recollections
small flowers- recollections
script tissue paper- my stash
large red flowers- Prima Marketing
small manila tags- The Paper Studio
Glubers large glue dots
vintage buttons and raffia ribbon- my stash
Tim Holtz distress ink barn door and vintage photo
Smooch Spritz by Clearsnap in Cherry Ice and Tea Party
Top Boss embossing ink, StazOn Jet Black Ink
UTEE and glossy accents
blue gems and pearls-my stash
Brown Zig Writer


Sunday, December 16, 2012

2 wedding layouts + why I love UTEE

Good morning friends! I hope you have enjoyed your week so far! I know I've been enjoying this cooler weather we've had, it finally feels like Christmas is around the corner in Alabama! But this time next year I'll be in Portland, Oregon and I'll probably be dying for some warmer sunny days! LOL! I wanted to share a few layouts I did earlier this week for my sister's wedding album. I already gave her the album thinking it was complete, then realized that I had a few more pics and about 5 more pages to do!! So I finished them as soon as I could and shipped everything to her in a big box along with her bday gift, her bday was Dec 11th. I  forgot to take pictures of the other 3 layouts I did of some of her honeymoon pics in Virginia Beach, which makes me sad cause they were so cute!!! Oh well, here are the ones I did take pics of, I did a simpler style of scrapping cause I was in such a time crunch, but I still am really happy with how they turned out:


I also wanted to share a quick 'tute' about heat embossing. This has become my favorite technique lately. I have been using UTEE or 'ultra thick embossing enamel' but of course embossing powder comes in several different colors, even scented! What I like about UTEE is that it's thicker, and it's clear, so you can stamp your image in black or a color, then clean your stamp and cover it with TOP boss or another clear embossing ink, then go over it again with that. Next sprinkle on some UTEE and heat it! You can even double heat it for an even cooler look. I recently bought a clear embossing ink daubber, which is super easy to use if you aren't stamping, but wanting to cover a larger surface. By heat embossing some old chipboard shapes or stickers, it creates a cool new shiny embellishment for your page or project! I have even experimented with coloring my stamps with Tim Holtz distress markers as ink along with other colors to get each part of the stamp in different colors, then heat embossed it! Way cool, right?? Next for Christmas I want some colored embossing powder and more stamps!!!! Here are some step by steps on how I heat embossed some old chipboard shapes and gave them new life:

1. Choose your items, could be a thicker sticker, chipboard, or even cardstock shape.

2. Next, cover it with clear embossing ink, making sure to be very generous with the coverage!

3. Working quickly, cover your object with UTEE or other embossing powder.

4. Next, pull out your heat gun and give it some heat! You can lightly heat it for a more varied look or heat it longer and the little beads will melt together and make an overall enameled look.


Cool right? Well I will definatley be doing more experimenting, especially once I get more embossing powder and stuff for Christmas! So stay tuned for more craftiness!! I love this time of year! Happy weekend, Y'all~ VV