Search This Blog

Showing posts with label distress ink. Show all posts

Tuesday, October 7, 2014

Ballgown Beauty

Hi friends and followers! I am back again today to share a layout I did a few weeks ago and hsve been meaning to share. The pictures are from the last MW holiday party we attended in Mobile, December of 2012. I received my 5 year award and they even remembered to announce my name as my new married name, Hollister. It was a great night and I have so many memories.

Here are a few pics:


That's it for today, short and sweet. I hope I have inspired you to get back to crafting. I definitely am feeling reenergized after an almost 2 month hiatus. I also think that the fall and winter months of the year are more conducive to creating, because we are inside more.

Check back in a few days for my full Halloween decor reveal with ALL the DEETS. Until thrn, rnjoy your week friends and happy crafting!!!

Saturday, June 14, 2014

A Rolling Stone Gathers No Moss

Happy Saturday everyone! I hope you are enjoying your summer thus far. I know I have really enjoyed the warmer weather and I am trying to get outside as much as possible! Here in the Pacific Northwest we have to grab the sunshine while we can!

My layout today is using the Carte Bella Wildflower collection that is ON SALE right now in the Frosted Designs store. I have used just about every last scrap of this collection and I keep coming back to it! You can get the ENTIRE collection including 12 12x12 double sided papers and matching cardstock sticker sheet for only $11.24!!!! This is a steal, especially considering that the quality of this paper is super thick and it can take alot of ink! As you will see in my layout today.


I started with some light gold cardstock as my base and then started building my layers. I actually used some packaging from some Prima stuff to be the base layer. Over that I put several of the different patterned papers, distressed them first, then added the sentiment block which I also distressed and inked. After those were laid down I went over with my Lindy's Stamp gang starburst spray in Tiffanylou Blu using a mask, I used both sides and smudged with my finger to make sure I didn't waste any ink. I went over that a second time with the same mask in a few spots using the Dylusions Spray in white linen. My all time favorite!! It really makes the sparkle of the Lindys stand out because it's such a contrast.


I laid down my pictures, some fussy cut elements from more of the paper, wood veneers, and had fun embellishing. 


It was alot of fun putting this together and I highly suggest buying this collection before it sells out! It's such a great deal and is perfect for those outdoor photos!! I hope you enjoyed my layout today! 


Products used:
Carte Bella Wildflower Collection
Steampunk Gold Trendy Tape
Lindy's Stamp Gang Try me Set Tiff Blue
Dylusions Ink Spray white linen
Prima Everyday Vintage Sugar Dots
Studio Calico wood veneer hearts & Arrows
Tim Holtz Distress ink Antique Linen & Tea Dye
Ingvild Blome Distressing Tool by Prima
flowers, buttons, cardboard-from my stash

Wednesday, September 25, 2013

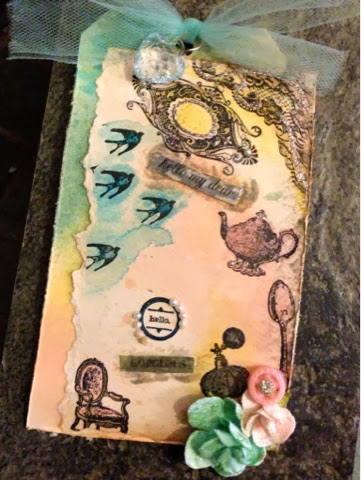
Tim Holtz 12 Tags of 2013: June catch up

So I'm a little late sharing my take on Tim's tag for June.but I did get to play around for a bit in the studio last week and finally got to create this tag. Better late than never right? I know I won't be able to win anything since I'm months behind but this gets me up to date with all of the tags for 2013! Can you believe there are only a few months left in the year?  So here's my share, take a look:


Products used:
Watercolor paper
#8 manila tag
Distress ink- broken China, antique linen
staz on jet black ink
Distress markers- broken China, spun sugar, bundled sage, antique linen, & picket fence
Recollections paper roses
prima stamp set- flourish, birds, shabby chair, spoon, teapot, perfume bottle
Mini mister with water
Mini pearls, paper distresser
Turquoise tulle, gem, jump ring, vintage button from stash
Stickler glitz in platinum, fruit punch and distress bundled Dave
Smooch spritz in candle glow and river mossy

Sunday, September 15, 2013

Tim Holtz 12 Tags of 2013: September

Hi everyone! I am popping in quickly this morning to share my take on Tim's tag for September. I finally got a few minutes to sit down and give it a try the other morning before a closing shift at work- it was nice to get a little mini crafty session in before work and I found that it really put me in a better mood for the rest of the day...thinking about all the stuff I want to try when I get back home! I tried to mimic his tag by using gesso instead of embossing paste on my background, then I stamped several images in layers of different distress ink colors. I am pretty happy with how it turned out! Here's our inspiration, Tim's September tag:


And this is my take:


I used distress inks to create my rainbow background after my gesso'd layer had dried. Over that I stamped in jet black archival ink several ornate squares, then reinked the same stamp with embossing ink and covered with UTEE. I heated with my heat tool and then started adding embellishments.

I used a piece of film strip ribbon, a vintage button, resin rose, staples, distress stickles, chit chat stickers and some flowers to bring the bottom of the tag together.


I am pretty happy with how it turned out. I debated about adding something else to the top but I left it as is. I still have to go back and do the tag for June but after that I will be up to date for the tags of 2013!! So proud of myself for playing along all year! 

Ok, well I am lucky enough to be off this Sunday. I'm going to grab some hot tea, as it's low 60s and misty rain here today- the perfect stay inside scrappy weather! We are expecting thunderstorms this afternoon, but I will be happily tucked away in my downstairs studio...tunes cranked, hoping to get some stuff done! Hubby is working until 6pm then it's Sunday night football and homemade burgers!! Looking forward to creative time today, it's been much needed and far and few between these last few weeks. Hope to back soon with more scrappy creations and goodies to share :)
until next time y'all~ VV

(product list)


Wednesday, March 27, 2013

dreaming of BEACH BLISS......

Hi everyone! Hope your week has had a great start! I am off work today, trying to tackle my massive to-do list which includes my least favorite thing: laundry. Hopefully though a little Starbucks this afternoon and some Pandora will help with motivation:) I had a take a quick break and share with you a layout I did a few nights ago, surprisingly a non-DT layout so I was happy about that...also just trying to get the mojo going so I can start some new Etsy projects for the shop. Hope this is some fresh inspiration for you today!

I scraplifted a layout that I found in a recent issue of Creating Keepsakes magazine.

Here are a few close ups:

I actually started the background by spraying some Glimmer Mist and Smooch Spritz in 'river mossy' and sunshine yellow, also lightly stamping with a large chevron background stamp. After that I distressed a few strips of leftover wooden plank paper across both pages to tie them together. Then I started adding my elements. I knew I wanted to use one of my very favorite paper lines, Out of Print by Basic Grey. I fussy cut the large doodle flowers from the paper and layered them with pop dot and topped off the center with a pearl sticker.


For the banner under the large photo, I used some blanket tickets from Purple Pumpkin that I stamped and misted, then cut out my own banner shapes from another scrap of BG paper- Lime Rickey and  canvas, which I also misted and distressed. I stapled them over the tickets and twine for a messy kind of look. I really like how it turned out and I will definately try this technique again!!

 Page 2 is full of instagram prints, which I LOVE on my layouts cause they are the perfect size!! Also stickers, thickers for the title, and some pretty flowers along with my fussy cut flowers.


I was excited to use my 'let's ride in tandem' bicycle stamp for the first time! It's so cute!!! Also got to use some of the wooden veneer boys and girls from the awesome giveaway I just won...so exciting! Can't wait to play with some more of those goodies again tonite!


And that's about it! Here's a look at my craft space in mid-mojo, I always enjoy sharing what I'm working on  instagram! 

And last but not least, when I went to take some layout photos by the patio door for natural light, of course my kitty had to be in the way. She loves window watching ;)


well, until next time friends, enjoy your mid-week inspiration! 
Peace Y'all~ VV


Tuesday, January 1, 2013

new year, new adventures, new crafts!

Good day everyone! Today is the first day of 2013!!! Can you believe it? I am extremely excited to start fresh, wipe the slate clean, and start to tackle some of my new goals for this year. Jimmy and I have an important move coming up in April and I will spend many, many hours in the few months ahead preparing for it, packing away, organizing and getting rid of unneeded things. We are embarking on a cross country journey and moving back to his home state of Oregon. I am very, very excited to experience life in a different part of the country and hopeful that there will be better job opportunities for his field of work there. We are both able to transfer with our companies, but I have been with mine for almost 6 years and he is looking for something better as soon as we get out there. We might even be renting a HOUSE instead of a tiny apartment which is very, very exciting!! All firsts for us as newlyweds. And I do have some life-goals in mind for myself for this year, but for now, I want to share what my 'crafty' goals are for 2013:

1. To turn my little Vintage Vixen Crafts blog and fb page eventually into an Etsy business, selling handmade mixed media canvasses, embellishments, custom albums and mini albums.

2. To expand my repertoire of crafting skills, by taking up something new or using a new product or tool.

3. To attempt Tim Holtz's 12 tags of 2013! Starting with January!

4. To complete my some of my list of pinterest projects!

5. To build/design my ideal crafts studio in our new home in Portland, with LOTS of organization!

With that said, I would like to share with you my very first mixed media canvas that I completed yesterday. I am not sure that I will be selling this one yet, but I have plans on making some more in the very near future! I have lots of ideas! I have to admit, I got this idea from one of my very favorite scrappers, Kelly Foster from her blog All the Pretty Things. A few weeks ago, she posted about how she was puzzled about how to use this cool cork piece that came in her DT kit, and instead of stowing it away in the pile of  stuff she was saving to alter, she ended up pulling it back out and making this cool canvas. I was really inspired by the quote she used, and I thought it would be a good starting point for not only my first canvas, but also for the new year! Here's a photo of her canvas as seen in this post:


Simply amazing, right? How could you not be inspired!! So even though I got the idea from her...well I used the quote but I didn't really use any of her design except for the layout of the words a little bit and the tags she used. I went for a totally different color scheme and I think my canvas is a little larger because I was reusing something that I already had. I tried to take step by step photos so you can see how I started building it, but got lost towards the end in the creative process, sorry! So here is a recap of what I did to create my canvas:

First, I started off by spray painting an old canvas I had lying around...one that I painted myself a while back that I didn't really like anymore, its about  13x24 size I think. 


Next, I let it dry for a while and took it into my craft room. I wanted to start my background using a mask, which I don't own any of yet, but I had this cutout paper with a pretty damask pattern so I used that to start with some of my new Gesso! It got kinda messy:

  After I masked both corners of the canvas using my fingers and a plastic knife, I heated it to dry. then I ripped my paper in half that I used the gesso on and sprayed it with Smooch Spritz in candleglow and caramel mocha. Then I heated it again and you could see the texture ridges on the paper from the knife, which was cool!! Also, while the gesso was still wet I scrunched up some tissue paper on the edges to add more texture. I had fun ripping away and making several layers with it.


I also pulled out some of my favorite papers, and decided on a color scheme of taupes, greys, yellows, whites, creams, and teal with a hint of black. Alot of colors I know but I knew it would work, this is my color scheme for my dream living room too! LOL!


I started to pull out all the other supplies that I thought I might need. They are pictured here except for the different adhesives I used including Sticky Thumb pop dots, large glue dots, and a permanent glue stick.


After I had my first 2 layers dry, I began to place my other background elements, including a 12 x 12 piece of corrugated cardboard, the remants of my masking sheet, and some patterned paper that looks like wooden planks that I cut into strips, distressed, and inked. I laid that behind the masked sheet and then used pop dots to pop it up. Also I pinned down the cardboard piece with lots of glue gloss and some tiny brads poked through the canvas, one in each corner. This is what it looked like in that step:


For the next step, I punched some large circles out of the mini grey dot paper, inked them in black, and tucked them under the edges on each side of my middle cardboard piece. I also started fussy cutting out some of the flowers from the Authentique paper and pop-dotted them up into place. I also tried stamping my large Heidi Swapp chandlier stamp and music notes stamp in a few places and used my new distress embossing powder in black soot, but it didnt' come out how I thought. I think my surface was too wet or sticky or something cause the image didn't really come out very clear.


Next, I fussy cut some cute cameras from the American Crafts' Amy Tangerine paper and colored them in with distress markers in antique linen and broken china.

 After that I inked them up good with Top Boss and sprinkled over generously with UTEE, then I was ready to heat them up for that cool, glossy look!
Here they are done and stacked up together on my canvas:


So after that step, I kinda stopped taking pictures cause I was fully into the creative process! I just started laying my pieces around until I was happy with the placement. I started with my patterned papers on the cardboard piece, then started adding more flowers to my fussy cut ones, buttons, lace, tulle, canvas, brads, resin flowers, and really piled the stuff on! I also used some of my TH fragments that I made last week, tying them all with twine.


After I had most of my elements in place, I made sure everything was glued down well and added tiny bits of washi tape, stickles for sparkle, and also small stamps in random places to make sure to tie in more of the black on my page. Also, I place my alphas around almost as the last step. 


 And here are a few close ups of all around the canvas, so much prettiness going on I had to make sure to snap them all! 


 And my favorite, the cameras stacked up in my 'burlap' canvas camera bag made out of Maya Road burlap circles, brads, and twine.


  Best photo I could get of it hanging on the wall, I will take more in daylight when it's not so cold out! 


 I plan to make a few more of these and get them up on my facebook page and see if they sell! If you have any special requests for a specific quote, theme, color scheme, or style please comment or message me on my facebook page! I am super excited about making my next one, not sure yet if I will sell this one yet! Right now it's my 'baby'! Took me almost 8 hours do! Until next time crafty friends, Peace Y'all~ VV

Supply List:

Papers used- Basic Grey 'Out of Print', MME 'Miss Caroline' -curious, Recollections grey mini dot, American Crafts Amy Tangerine 'sketchbook', Echo Park 'note to self', Lilybee Designs 'memorandum time clock', Authentique 'Blissful' collection 'happiness'

flowers- Prima Marketing and Recollections

Tim Holtz- distress inks in black soot, vintage photo, and antique linen
distress markers- antique linen and broken china
fragment charms, memo pins, alpha tiles, metal key pieces

Purple Pumpkin- twine in yellow, teal, brown, crochet doily

Ranger Stickles- crystal and patina

Smooch Spritz by Clearsnap- caramel mocha, candlelight, river mossy, pralines n' cream

Stamps- Heidi Swapp, 7 Gypsies, Prima Marketing, Studio G, and Recollections

Thickers- Amy Tangerine in 'goodness' 'scene' and 'muse' also 'Doll'

StazOn jet black ink and Top Boss Embossing ink

Other- washi tape, vintage lace, vintage buttons, corrugated cardboard, brads, spray paint, Gesso, UTEE, Maya Road burlap pieces, paper distresser, adhesives, Martha Stewart tinsel glitter, 
& misc chipboard pieces