Search This Blog

Showing posts with label tim holtz. Show all posts

Tuesday, June 17, 2014

Classroom Wall Hanging

Hi friends! I hope you are having a fabulous day! I know things have been pretty good here, I just love summertime and I have been really trying to allow myself more and more time to create on my off days. It really feeds my soul and helps me zone out from stress- work stress, money stress, etc. It's my own little place in the world where I can be for hours by myself and come out feeling like I'm in a much better mood than before.

Today I am sharing a wall hanging I did for my sister's classroom. She just recieved her graduate degree in English Literature Education from the University of Alabama. She was an undergrad at Birmingham Southern before that, and even though she is my younger sister, I really look up to her in so many ways. This will be her first year teaching and along with helping her build a classroom library, I wanted to make her a little something special. She and her hubby were visiting me in Portland back at the end of March for Spring Break and we went to Powell's Books of course...famous bookstore one entire city block! I found this quote on a card and it inspired me, I thought I could take that quote and do something with it.


So I started off with a piece of scrapwood from Hubby's work, I did a thin layer of gesso over it first. Then I started laying down some paper pieces with modge podge. I used alot of pieces from a Tim Holtz set that looked like an old book page, an old library card, and layered them. I did another layer of modgepodge.

Then I went to work making the 'girl' I traced the shape of a girl I had from scrapbook paper, then seperatley cut out her dress and hair with different paper. I glued them together then went over them with a marker and then a white gelly roll pen for the polka dots on her dress. I used some mini pearls for her earrings, braclet and barette. I went back over her hair with a few different markers, then I let her dry. 


After she was dry I cut out some random scrap pieces for 'books' and I had to redraw her hand from the original pose to make it look more realistic. I modge podged her to the right side of the wood and then finished coloring in the lamppost and sign.

For the finishing touches, I used a piece of metal tape for one side of the lamp post and I went back over it several times with a wet brush and  a black gelato. I also glued down one of my vintage trinkets from prima- the lightbulb!  Last I laid down the letters. A mix of glitter thickers that I went over with Tim Holtz distress ink in barn door, and sticker letters that I traced with a white gelly roll pen. I went back with more stickles in christmas red and copper, then added a few enamel dots. I went back over the white areas with another coat of gesso just to make the image look cleaner, then heated well to dry! 


Well that's about it for today. I hope you have enjoyed my share. It took me several evenings to get it done but I am very pleased with the outcome and I'm off to mail it to my sis tomorrow morning!! I have several more ideas and projects in the works...I hope to be able to share them with you soon! I am looking forward to more creative time this week in between work, cooking, cleaning, and walks with hubby. Enjoy your week & until next time, Peace Yall~

Tuesday, January 14, 2014

Word of the Year! my first venture into art journaling..

Hi everyone! I am very excited to be here today to share my very first ever art journal page! I have been influenced, awed, and inspired by fellow Frosted Designs team member, Sandee to take a leap of faith and try it out! I had no idea how much fun it would be! If you haven't been following her Sundays with Sandee series on the Frosted Designs blog, you should stop what you're doing and go check out some of her videos right now!! You can find them all here: http://frosteddesigns.blogspot.com/p/sundays-with-sandee.html

So one of the posts that really inspired me was her 'word of the year' page. I spent several days researching this new idea of using one word for your new year's resolution instead of a list of several things. Obviously, its alot simpler and easier to remember, but it's more than that. After much thinking, I tried to pick a word that would help me in every aspect of my life, health wise, work wise, etc. When I ask myself about a decision Im about to make I will use this word to help me make the right decision. The word I chose is THRIVE.

I think it's a perfect fit for what I want to accomplish this year. I want to get healthier, become more active, advance in my career, and accomplish more creatively. I want to stand up for my life, and do what's best for me and my husband, instead of taking on tasks or volunteering for things when I could have better spent my time doing something else.I want to ultimatley look back on this year in 2015 and say that it was a time of determination and strength for me to push forward to something better. I think so far it hasnt been too bad of a start. Yesterday was the perfect kick-off to what i hope will be a better routine for Jimmy and I.

Ok, enough chat, now to share some pics of my page. The first thing I did was take some gesso with a mask I have (not sure the brand) and put it over several parts of my page. As you will see, thru pencil drawings, water misting, and using my gelatos it created kind of a 'resist' effect which was a happy accident. I was expecting to be able to color over it and was really only using it for the texture. This is a photo of the first step, after I gesso'd then drew my base which was a 'rock wall. Originally I was going to make it solid but in hand drawing all the stones I found a natural place where a hole should go so I added it.


The next photo is after I colored in the rock wall using some gelatos, grey and yellow, misted over with water, smudged with my fingers, and then dried it. I also took out some of my grungeboard letters in this step and started to figure out placement.


The last picture I took before the finishing touches was when I began to draw in the vines. I drew them in with pencil, then used several gelly roll pens to re trace them in the later step. I also had already glued down my letters that were colored with gelatos then inked over with Tim Holtz distress stain in vintage photo. The sun behind the wall is also pencil drawn then colored using sharpies, then gelatos blended in.


And this is the finished product. I added the 2014 in grungeboard letters at the bottom which I covered in Dylusions spray white linen and stickles in Tiara. The quote off to the side is from a song and I did some more journaling in very small letters on the tails of my hearts. Mostly affirmations to myself about the individual ways I want to THRIVE in 2014.


Thank you so much for stopping by today. I really love reading all your blogs and getting comments. I hope to give you some bloggy love soon! Maybe later today after I tackle this laundry pile and go for our walk. Then it's back to the studio for more creative time!!!! I hope you have a great week & can get some creative therapy time in for yourself. Peace~ VV

Supply List from the Frosted Designs store: Ranger Dylusions Ink Spray - melted chocolate, Ranger Dylusions Creative Journal, Faber Castel Gesso, Faber Castel 50's Diner gelatos, water brush, Gelly roll pens

Other: Stickles 'tiara' Tim Holtz grunge board letters, Tim Holtz distress stain 'vintage photo' epoxy heart stickers, bird stamp from stash, Tim Holtz distress markers-bundled sage, spun sugar, broken china, antique linen, pencil

Wednesday, November 27, 2013

Tim Holtz: 12 Tags of 2013: November

This month, we were challenged to copy Tim's unique 'chalkboard' technique for our tag. It was a lot of fun playing around and trying to get the same effect. This was Tim's tag, our inspiration:


I didn't have a black tag, so I cut one from cardstock. I also didn't have timestamps or chalk so I tried to recreate the effect using my picket fence distress marker and some black distress embossing powder. In the end I found that it wasn't 'chalky' enough so I went over some of the leaves with clear tinsel glitter. Overall I like it, but I definitely want some new Tim Holtz stuff for Christmas!!


Wishing you a happy Thanksgiving! Last thing I'll share is some fun stamping I did on cork pieces while I was experimenting with my tag. Until next time, keep scrapping friends!! ~VV


Wednesday, October 9, 2013

Tim Holtz 12 Tags of 2013: October


Good evenin' friends. I can't believe October is here. This is my favorite month of the year, no  on my because it's our anniversary month, but lots of other favorite things, pumpkin spiced lattes, leaves changing ( gotta get some  goo  pics of those soon they are gorgeous right now!!) Football, the crisp air, and all things Halloween- including movie marathons and candy corn!! Hocus Pocus is my favorite:) it's also especially exciting this year because  I get to experience my first true seasonal change in Oregon.

I am stopping by today to share my version of Tim's tag for October. I always try to challenge myself to use the supplies I have on hand, and for this tag it was especially hard, I have been wanting some of the new seasonal release stamps and dies for a while, alas I still don't own a vagabond so I had to make do. I did have some blank grungeboard, and son  of the distress ink colors he used. For everything else I had to think outside the box! That's why these challenges are so awesome. I can't wait to get my hands on some  real distress glitter though! This was our inspiration, Tim's fabulous tag:


Here's the first tag: (again excuse my photos I haven't gotten used to editing on this tablet yet:/ )


I started my tag by using some of the distress inks on my makeshift nonstick Kraft mat- I used dusty concord, scattered straw, and spiced marmalade. I then wet the surface of my #8 tag before swiping it thru the inks like Tim does. I was really pleased with how the background turned out after a couple of tries. I then went around the edges with a ink blending tool loaded up with black soot for a nice border.


After that, I cut out a few squares of grungeboard and put a black cat and moon sticker from an old creative memories pack, then edged it in black soot, and went over it good with embossing powder and UTEE then heat set it. I led it heat for a while, it made some of the parts bubble up a bit. I also had some frames leftover from another Halloween pack that I glittered and pop dotted up around the cat. I added some black star blingys and tulle and ribbon to finish it off. 

For the second tag, I inked the background directly from the ink pad, then used a distress marker in bundled sage and blended with water. After that I added the pumpkin sticker to the bottom and drew around them with a sharpie. I had another grungeboard moon that I cut out, stamped around and started adding in other embellishments.


I had fun with some old epoxy stickers, glossy accents, and stickles in copper and black diamond. I haven't used these in a while so it was fun to doodle around the moon. This  is a smaller Kraft tag so I used mess ribbon and some staples to finish it off. 


Here are a few shots of both tags:)


Thanks so much for stopping by tonight. I have been so busy lately with work.stuff that creative time has really been on the backburner. But with the colder weather on its way, and more days inside on the horizon, I feel.like the mojo is coming back. I am so looking forward to next weekend...it's our 1 year wedding anniversary and we have a mini road trip.planned and some other fun stuff:) I hope to get some  good pictures!!


Friday, September 27, 2013

Creativity with Texture: FD challenge

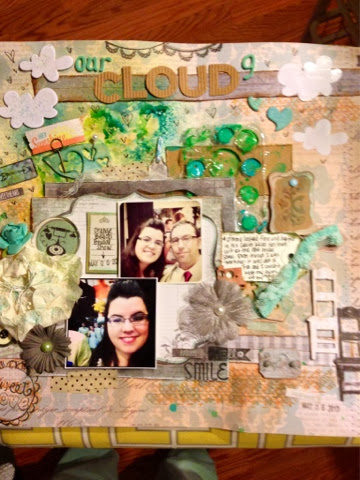
Hi friends and followers! I am popping in today to share my latest project for the new challenge over at Frosted Designs! This time we are challenging you to create any off the page project, mini album, layout or canvas using texture as part of your background elements. Mixed media is so hot right now in scrapbooking, and we wanted to inspire you to get messy with inks, mists, paints, molding  paste, or gesso! So break out your tools and join us this week, the lucky winner chosen by the DT gets a $30 voucher for chipboard and bling from our lovely sponsor, Molossi. We can't wait to see what you create!

Here is my project ( excuse the unedited photos, my laptop died last week and I'm still getting used to this tablet :)


I really enjoyed creating lots of texture on my project background using stamping, a gesso layer first, then mists, and leftover product packaging as well as heat embossing some areas and stamping/ doodling. It's always fun to get messy! We hope you will join us and link up your project to the Frosted Designs blog no later than Oct 10th for a chance to win our fabulous prize from Molossi !!!

Wishing you happy scrapping and a great weekend~ VV


Products used from the New Frosted Designs store:
Melissa Frances paper- Bits and Pieces
Fab Scraps- shabby chairs and shabby mix
MME Cut n Paste chipboard stickers
Faber Castel Gesso
Dylusions Inks by Ranger- Calypso Teal, White Linen

Other product used:
Tim Holtz- distress ink antique linen, distress stickies bundled sage, tumbled glass; distress markers broken China, antique linen, bundled sage, paper distress tool
 Product packaging, prima flowers, Patina metal inks by Ranger, UTEE, heat embossing ink, jet black ink, Hero Arts shadow ink in apricot, Tattered angels glimmering chalkboard inks in apricot nectar and London fog, black doodle pen, vintage button, resin roses, Thickets chipboard stickers alphas and Amy Tangerine thickets, misc stamps, mint lace and tags from stash.


Wednesday, September 25, 2013

Tim Holtz 12 Tags of 2013: June catch up

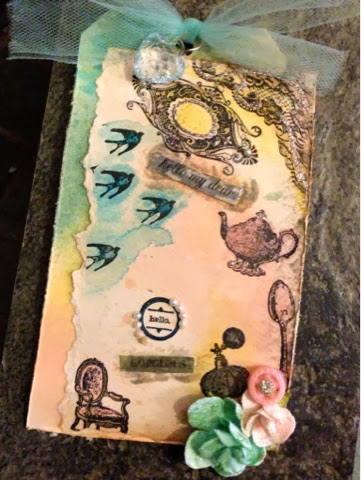
So I'm a little late sharing my take on Tim's tag for June.but I did get to play around for a bit in the studio last week and finally got to create this tag. Better late than never right? I know I won't be able to win anything since I'm months behind but this gets me up to date with all of the tags for 2013! Can you believe there are only a few months left in the year?  So here's my share, take a look:


Products used:
Watercolor paper
#8 manila tag
Distress ink- broken China, antique linen
staz on jet black ink
Distress markers- broken China, spun sugar, bundled sage, antique linen, & picket fence
Recollections paper roses
prima stamp set- flourish, birds, shabby chair, spoon, teapot, perfume bottle
Mini mister with water
Mini pearls, paper distresser
Turquoise tulle, gem, jump ring, vintage button from stash
Stickler glitz in platinum, fruit punch and distress bundled Dave
Smooch spritz in candle glow and river mossy

Sunday, September 15, 2013

Tim Holtz 12 Tags of 2013: September

Hi everyone! I am popping in quickly this morning to share my take on Tim's tag for September. I finally got a few minutes to sit down and give it a try the other morning before a closing shift at work- it was nice to get a little mini crafty session in before work and I found that it really put me in a better mood for the rest of the day...thinking about all the stuff I want to try when I get back home! I tried to mimic his tag by using gesso instead of embossing paste on my background, then I stamped several images in layers of different distress ink colors. I am pretty happy with how it turned out! Here's our inspiration, Tim's September tag:


And this is my take:


I used distress inks to create my rainbow background after my gesso'd layer had dried. Over that I stamped in jet black archival ink several ornate squares, then reinked the same stamp with embossing ink and covered with UTEE. I heated with my heat tool and then started adding embellishments.

I used a piece of film strip ribbon, a vintage button, resin rose, staples, distress stickles, chit chat stickers and some flowers to bring the bottom of the tag together.


I am pretty happy with how it turned out. I debated about adding something else to the top but I left it as is. I still have to go back and do the tag for June but after that I will be up to date for the tags of 2013!! So proud of myself for playing along all year! 

Ok, well I am lucky enough to be off this Sunday. I'm going to grab some hot tea, as it's low 60s and misty rain here today- the perfect stay inside scrappy weather! We are expecting thunderstorms this afternoon, but I will be happily tucked away in my downstairs studio...tunes cranked, hoping to get some stuff done! Hubby is working until 6pm then it's Sunday night football and homemade burgers!! Looking forward to creative time today, it's been much needed and far and few between these last few weeks. Hope to back soon with more scrappy creations and goodies to share :)
until next time y'all~ VV

(product list)