Search This Blog

Showing posts with label distress markers. Show all posts

Tuesday, June 24, 2014

Steampunk Bird Card :)


Hi blogland friends! I am stopping in for a quick post today to share a card I did yesterday morning for my sister. I have a care package I'm sending to her with her wall hanging for her classroom, a card, and some other goodies. I love putting together a box to send. The excitement of getting real mail, especially a box, will always entertain me!

I used a blank card I already had and covered it with scrap paper, then I stamped by steampunk bird stamp by Deep Red Stamps and colored him in using distress markers and stickles. I love how it turned out!


I added a chipboard circle and some enamel dots then washi tape and my alphas. I hope my sis likes it. I can't wait for her to open her box!!


Until next time, I hope you have a crafty day! I'm off to the bank, post office, and goodwill, then iced coffee and studio time ;)


Wednesday, February 19, 2014

Be as a Bird...

Hi friends! Happy Hump-day! I hope you are enjoying your week so far. I just had 2 days off so I was able to get in a little bit of crafty time. I had hoped we would also get to visit the park again one afternoon but it's been really windy here and rainstorms coming thru. Better comparativley to the snow we had about a week ago, but still yucky out. I did enjoy some time in my studio, the more time I spend back there I realize even though its small it's a place that makes me so totally and completly happy, surrounded by all my fun stuff, usually a cup of hot tea or iced coffee depending on the time of day, my pandora blasting away and plenty of inspiration from friends and fellow DT members. Today I wanted to share my 2nd ever art journal page that I did last night. I haven't tackled all of them and the million ideas that I have yet, but I am going to make it a goal to do one layout + one art journal page per week for the rest of the year. I think I can do it. I think it's nice too to go between the two, art journaling loosens up your mind and helps your creativity flow better, which in turn helps you scrap a page faster when you have good ideas!!! So the one I worked on last night was inspired by Sandee's " Out On A Limb" post on the FD blog a while back, like I said I am still catching up, hopping around here and there, I don't have as much free time as some, but this page probably only took me like 2.5 hours. That's about how long it takes me to do a layout too, I'm not sure if that makes me a slow scrapper!

Here is the inspiration photo:


And if you want to read more about how Sandee created her page, you can visit the FD archives here: sundays-with-sandee-is-out-on-limb. She has a great video & pictures.

Here is my page:


I did use the understamping for my page like she did, however I stamped directly on to my art journal then used some tissue paper that I misted with inks & water then dried. I found a great quote that I did on the side after drawing straight lines, then I started coloring in behind it with gelatos. I wanted some texture so I later added the chipboard flowers and washi tape.


The birds in the tree actually came from some old Basic Grey paper, I fussy cut them then decoupaged it onto my page. I went back over it with various pens and markers then stamped my other musical notes and did some doodles around those. I went back in with 3 different colors of stickles: christmas red, fruit punch, and tiara.


I dont know why but I felt like I needed something else at the top of my page, so I stamped this decorative frame and stuck a puffy sticker inside it. It's kind of random but I feel like it gives visual balance to the page, so much for WHITE SPACE, ha!


Thank you so much for stopping by today. i hope to have at least one more layout and art journal page to share this time with you next week! Maybe even some stuff for challenges coming up....who knows. The crafty bug has bit again and I am so glad!! It makes me happy to share and get feedback! I would love it if you followed my fb page here. Also on instagram @khhollister. Peace Yall! ~VV

Wednesday, September 25, 2013

Tim Holtz 12 Tags of 2013: June catch up

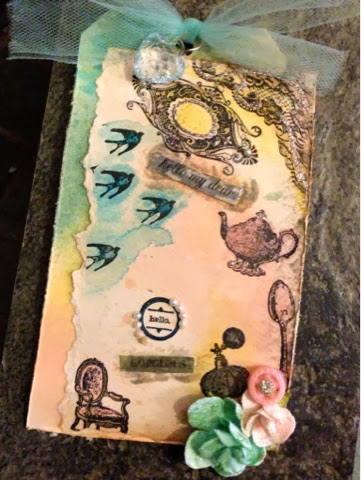
So I'm a little late sharing my take on Tim's tag for June.but I did get to play around for a bit in the studio last week and finally got to create this tag. Better late than never right? I know I won't be able to win anything since I'm months behind but this gets me up to date with all of the tags for 2013! Can you believe there are only a few months left in the year?  So here's my share, take a look:


Products used:
Watercolor paper
#8 manila tag
Distress ink- broken China, antique linen
staz on jet black ink
Distress markers- broken China, spun sugar, bundled sage, antique linen, & picket fence
Recollections paper roses
prima stamp set- flourish, birds, shabby chair, spoon, teapot, perfume bottle
Mini mister with water
Mini pearls, paper distresser
Turquoise tulle, gem, jump ring, vintage button from stash
Stickler glitz in platinum, fruit punch and distress bundled Dave
Smooch spritz in candle glow and river mossy

Thursday, May 2, 2013

Tim Holtz: 12 Tags of 2013: May

Good afternoon friends! I am back today to share my take on Tim's tag for May. I am so proud that I have been playing along all year and I'm starting to collect a nice little batch of tags that I currently display in my craft room! It's been really fun to try and come up with something similar to get the look with all the techniques he's used. I am not very wealthy so I don't have ALL the items he's used, but I have been able to improvise here and there. So here is Tim's tag, and this time he used remnant rubs then distress paint over them for a image-collage resist kind of look:


I started with a #8 manila tag, and used some distress inks and other inks to get the rainbow effect. I then misted with water to blend and heated with my heat gun. Then I started to add my cut out pieces for the 'rub on' parts and I had some washi tape that was film strip so I added that, then heat embossed it and other parts with UTEE. I did have the crinkle ribbon so I inked and sprayed that as well to add to the top. Here are some photos:


And some close ups of my stamping and embellishments that were added:

 The 2 bee embellishments I made with some tim holtz fragments, paper and my favorite mini bee stamp from 7 Gypsies. Then I used glossy accents to glue them to the fragment for a custom embellishment. I tried to miz musical notes, titles of places, bees, stamps and the 2 different washi tapes to try and create that 'image collage' affect. 


Thanks so much for stopping by today. If you would like to see my take on the other tags for 2013, just check out the Archives at the bottoms of the sidebar. I love getting comments! Good luck if you are playing along this month too, I know we would all love to win that TH prize pack!!!! Until next time, Peace Y'all~VV 


Wednesday, March 27, 2013

dreaming of BEACH BLISS......

Hi everyone! Hope your week has had a great start! I am off work today, trying to tackle my massive to-do list which includes my least favorite thing: laundry. Hopefully though a little Starbucks this afternoon and some Pandora will help with motivation:) I had a take a quick break and share with you a layout I did a few nights ago, surprisingly a non-DT layout so I was happy about that...also just trying to get the mojo going so I can start some new Etsy projects for the shop. Hope this is some fresh inspiration for you today!

I scraplifted a layout that I found in a recent issue of Creating Keepsakes magazine.

Here are a few close ups:

I actually started the background by spraying some Glimmer Mist and Smooch Spritz in 'river mossy' and sunshine yellow, also lightly stamping with a large chevron background stamp. After that I distressed a few strips of leftover wooden plank paper across both pages to tie them together. Then I started adding my elements. I knew I wanted to use one of my very favorite paper lines, Out of Print by Basic Grey. I fussy cut the large doodle flowers from the paper and layered them with pop dot and topped off the center with a pearl sticker.


For the banner under the large photo, I used some blanket tickets from Purple Pumpkin that I stamped and misted, then cut out my own banner shapes from another scrap of BG paper- Lime Rickey and  canvas, which I also misted and distressed. I stapled them over the tickets and twine for a messy kind of look. I really like how it turned out and I will definately try this technique again!!

 Page 2 is full of instagram prints, which I LOVE on my layouts cause they are the perfect size!! Also stickers, thickers for the title, and some pretty flowers along with my fussy cut flowers.


I was excited to use my 'let's ride in tandem' bicycle stamp for the first time! It's so cute!!! Also got to use some of the wooden veneer boys and girls from the awesome giveaway I just won...so exciting! Can't wait to play with some more of those goodies again tonite!


And that's about it! Here's a look at my craft space in mid-mojo, I always enjoy sharing what I'm working on  instagram! 

And last but not least, when I went to take some layout photos by the patio door for natural light, of course my kitty had to be in the way. She loves window watching ;)


well, until next time friends, enjoy your mid-week inspiration! 
Peace Y'all~ VV


Wednesday, January 9, 2013

Tim Holtz: 12 tags of 2013: January

Good evenin' blogland! I'm up late tonite to share with you my very first tag for the 12 tags of 2013! So excited that this year my goal is to do all 12. I am so inspired by Tim's work and LOVE all of his products. Maybe one day I can actually go to CHA in California and meet him! That would be such a dream...to take one of his workshops...oh my goodness I guess I should keep on dreaming. But hey, we'll be living in Oregon by the first of May, CA/AZ aren't that far away then! Maybe he'll even have a show or something in Portland if I'm lucky??!!

So one thing that really caught my eye about this month's tag was the stamped quote that he used. It really just hit home for me...thinking about how time really does fly and we can't stop it. It's a new year and there are new goals and plans for the future...yet in all our hustle and bustle we need to take a few moments a day to enjoy where we are in life, to appreciate the little things. I think that's really important and it's part of my new year's resolutions. This is a photo of Tim's tag:


 I didn't of course have the stamp he used or alot of the materials at all, but I did have distress ink, markers, mist, a manila tag, and some TH paper so I started from there! I also had 2 different clock stamps that I used as my background instead of the embossing folder...oh man..here I go dreaming again maybe one day I'll buy myself a vagabond!! So after I made my background I started layering my pieces on. I cut out a calendar and a small clock piece from some TH paper and distressed/ inked it. I am really happy with how it turned out...even though I don't have any cogs or gears on there I kinda went with the 'TIME' theme. Here is how mine turned out:


And here are a few pics I took just now on instagram to tag them!


Ok, well that is all I wanted to share for tonite...hope you enjoy your night and your weekend ahead! I will be working of course crazy retail hours but I will make an effort to stop and 'smell the roses' each day and be thankful for what I have. Another New year's resolution started along with doing these tags. Until next time, Peace Y'all~ VV

Supplies Used:
TH distress inks- vintage photo, tea dye, black soot
Ranger    spray 'melted chocolate'
TH paper distressing tool
TH distress markers- bundled sage, picket fence
medium kraft tag
fussy cut elements from TH 'Lost and Found' paper collection
fussy cut clock from We R Memory Keepers 'antique chic' collection
Colorbox chalk ink by Clearsnap-lipstick and grey whale
brads, ribbon, vintage button and fibers from my stash
Top Boss embossing ink and UTEE
tiny flower and bling- Prima Marketing


Tuesday, January 1, 2013

new year, new adventures, new crafts!

Good day everyone! Today is the first day of 2013!!! Can you believe it? I am extremely excited to start fresh, wipe the slate clean, and start to tackle some of my new goals for this year. Jimmy and I have an important move coming up in April and I will spend many, many hours in the few months ahead preparing for it, packing away, organizing and getting rid of unneeded things. We are embarking on a cross country journey and moving back to his home state of Oregon. I am very, very excited to experience life in a different part of the country and hopeful that there will be better job opportunities for his field of work there. We are both able to transfer with our companies, but I have been with mine for almost 6 years and he is looking for something better as soon as we get out there. We might even be renting a HOUSE instead of a tiny apartment which is very, very exciting!! All firsts for us as newlyweds. And I do have some life-goals in mind for myself for this year, but for now, I want to share what my 'crafty' goals are for 2013:

1. To turn my little Vintage Vixen Crafts blog and fb page eventually into an Etsy business, selling handmade mixed media canvasses, embellishments, custom albums and mini albums.

2. To expand my repertoire of crafting skills, by taking up something new or using a new product or tool.

3. To attempt Tim Holtz's 12 tags of 2013! Starting with January!

4. To complete my some of my list of pinterest projects!

5. To build/design my ideal crafts studio in our new home in Portland, with LOTS of organization!

With that said, I would like to share with you my very first mixed media canvas that I completed yesterday. I am not sure that I will be selling this one yet, but I have plans on making some more in the very near future! I have lots of ideas! I have to admit, I got this idea from one of my very favorite scrappers, Kelly Foster from her blog All the Pretty Things. A few weeks ago, she posted about how she was puzzled about how to use this cool cork piece that came in her DT kit, and instead of stowing it away in the pile of  stuff she was saving to alter, she ended up pulling it back out and making this cool canvas. I was really inspired by the quote she used, and I thought it would be a good starting point for not only my first canvas, but also for the new year! Here's a photo of her canvas as seen in this post:


Simply amazing, right? How could you not be inspired!! So even though I got the idea from her...well I used the quote but I didn't really use any of her design except for the layout of the words a little bit and the tags she used. I went for a totally different color scheme and I think my canvas is a little larger because I was reusing something that I already had. I tried to take step by step photos so you can see how I started building it, but got lost towards the end in the creative process, sorry! So here is a recap of what I did to create my canvas:

First, I started off by spray painting an old canvas I had lying around...one that I painted myself a while back that I didn't really like anymore, its about  13x24 size I think. 


Next, I let it dry for a while and took it into my craft room. I wanted to start my background using a mask, which I don't own any of yet, but I had this cutout paper with a pretty damask pattern so I used that to start with some of my new Gesso! It got kinda messy:

  After I masked both corners of the canvas using my fingers and a plastic knife, I heated it to dry. then I ripped my paper in half that I used the gesso on and sprayed it with Smooch Spritz in candleglow and caramel mocha. Then I heated it again and you could see the texture ridges on the paper from the knife, which was cool!! Also, while the gesso was still wet I scrunched up some tissue paper on the edges to add more texture. I had fun ripping away and making several layers with it.


I also pulled out some of my favorite papers, and decided on a color scheme of taupes, greys, yellows, whites, creams, and teal with a hint of black. Alot of colors I know but I knew it would work, this is my color scheme for my dream living room too! LOL!


I started to pull out all the other supplies that I thought I might need. They are pictured here except for the different adhesives I used including Sticky Thumb pop dots, large glue dots, and a permanent glue stick.


After I had my first 2 layers dry, I began to place my other background elements, including a 12 x 12 piece of corrugated cardboard, the remants of my masking sheet, and some patterned paper that looks like wooden planks that I cut into strips, distressed, and inked. I laid that behind the masked sheet and then used pop dots to pop it up. Also I pinned down the cardboard piece with lots of glue gloss and some tiny brads poked through the canvas, one in each corner. This is what it looked like in that step:


For the next step, I punched some large circles out of the mini grey dot paper, inked them in black, and tucked them under the edges on each side of my middle cardboard piece. I also started fussy cutting out some of the flowers from the Authentique paper and pop-dotted them up into place. I also tried stamping my large Heidi Swapp chandlier stamp and music notes stamp in a few places and used my new distress embossing powder in black soot, but it didnt' come out how I thought. I think my surface was too wet or sticky or something cause the image didn't really come out very clear.


Next, I fussy cut some cute cameras from the American Crafts' Amy Tangerine paper and colored them in with distress markers in antique linen and broken china.

 After that I inked them up good with Top Boss and sprinkled over generously with UTEE, then I was ready to heat them up for that cool, glossy look!
Here they are done and stacked up together on my canvas:


So after that step, I kinda stopped taking pictures cause I was fully into the creative process! I just started laying my pieces around until I was happy with the placement. I started with my patterned papers on the cardboard piece, then started adding more flowers to my fussy cut ones, buttons, lace, tulle, canvas, brads, resin flowers, and really piled the stuff on! I also used some of my TH fragments that I made last week, tying them all with twine.


After I had most of my elements in place, I made sure everything was glued down well and added tiny bits of washi tape, stickles for sparkle, and also small stamps in random places to make sure to tie in more of the black on my page. Also, I place my alphas around almost as the last step. 


 And here are a few close ups of all around the canvas, so much prettiness going on I had to make sure to snap them all! 


 And my favorite, the cameras stacked up in my 'burlap' canvas camera bag made out of Maya Road burlap circles, brads, and twine.


  Best photo I could get of it hanging on the wall, I will take more in daylight when it's not so cold out! 


 I plan to make a few more of these and get them up on my facebook page and see if they sell! If you have any special requests for a specific quote, theme, color scheme, or style please comment or message me on my facebook page! I am super excited about making my next one, not sure yet if I will sell this one yet! Right now it's my 'baby'! Took me almost 8 hours do! Until next time crafty friends, Peace Y'all~ VV

Supply List:

Papers used- Basic Grey 'Out of Print', MME 'Miss Caroline' -curious, Recollections grey mini dot, American Crafts Amy Tangerine 'sketchbook', Echo Park 'note to self', Lilybee Designs 'memorandum time clock', Authentique 'Blissful' collection 'happiness'

flowers- Prima Marketing and Recollections

Tim Holtz- distress inks in black soot, vintage photo, and antique linen
distress markers- antique linen and broken china
fragment charms, memo pins, alpha tiles, metal key pieces

Purple Pumpkin- twine in yellow, teal, brown, crochet doily

Ranger Stickles- crystal and patina

Smooch Spritz by Clearsnap- caramel mocha, candlelight, river mossy, pralines n' cream

Stamps- Heidi Swapp, 7 Gypsies, Prima Marketing, Studio G, and Recollections

Thickers- Amy Tangerine in 'goodness' 'scene' and 'muse' also 'Doll'

StazOn jet black ink and Top Boss Embossing ink

Other- washi tape, vintage lace, vintage buttons, corrugated cardboard, brads, spray paint, Gesso, UTEE, Maya Road burlap pieces, paper distresser, adhesives, Martha Stewart tinsel glitter, 
& misc chipboard pieces