Search This Blog

Showing posts with label vintage. Show all posts

Tuesday, July 8, 2014

Vintage Ring Box

Hi friends! I'm stopping in today with a quick post before I have to get dinner on the table and then hopefully some scrappy time later this evening. The community that we live in in Southeast Portland is pretty awesome! We have a community garden, basketball court, our own laundry facilities and a 'free' donation space near it. We are still living in an apartment but it's much bigger and more renovated than our old place. The best part is the neighborhood and how small it is- only 12 units total. So I was rummaging through the 
free pile the other day and I found a cute little all wood ring box. It was kinda dirty on top, but I decided I could do something with it!

I sanded the top first, then I modge podged some paper to it and some other little things, one of them is a boquet charm I made for my wedding day with a vintage picture of my mom. I wanted to add that so that everytime I put something in or take something out of the box, I could see her face. I sure do miss her, can't believe it has been 18 years. I sure don't feel 18 years older.

Here are some photos:


a close up of the buttons, pearls, and rose I added to the top.


My favorite part is the little saying it has on the front I really like how it turned out and I am keeping it on a side table near where I always sit at the end of the day. It was fun making this into something cute with something I got for free!!

Well, it's time to help hubby finish up dinner, eat good, then maybe some scrap time. I am mid-way through a layout I started a few days ago for the Punky Scraps Challenge. I hope I still have time to finish and submit it!! Here's to a glass of iced tea, some good tunes, and studio time :) hoping you get yours in this week too! until next time yall~ peace VV

Tuesday, June 17, 2014

Classroom Wall Hanging

Hi friends! I hope you are having a fabulous day! I know things have been pretty good here, I just love summertime and I have been really trying to allow myself more and more time to create on my off days. It really feeds my soul and helps me zone out from stress- work stress, money stress, etc. It's my own little place in the world where I can be for hours by myself and come out feeling like I'm in a much better mood than before.

Today I am sharing a wall hanging I did for my sister's classroom. She just recieved her graduate degree in English Literature Education from the University of Alabama. She was an undergrad at Birmingham Southern before that, and even though she is my younger sister, I really look up to her in so many ways. This will be her first year teaching and along with helping her build a classroom library, I wanted to make her a little something special. She and her hubby were visiting me in Portland back at the end of March for Spring Break and we went to Powell's Books of course...famous bookstore one entire city block! I found this quote on a card and it inspired me, I thought I could take that quote and do something with it.


So I started off with a piece of scrapwood from Hubby's work, I did a thin layer of gesso over it first. Then I started laying down some paper pieces with modge podge. I used alot of pieces from a Tim Holtz set that looked like an old book page, an old library card, and layered them. I did another layer of modgepodge.

Then I went to work making the 'girl' I traced the shape of a girl I had from scrapbook paper, then seperatley cut out her dress and hair with different paper. I glued them together then went over them with a marker and then a white gelly roll pen for the polka dots on her dress. I used some mini pearls for her earrings, braclet and barette. I went back over her hair with a few different markers, then I let her dry. 


After she was dry I cut out some random scrap pieces for 'books' and I had to redraw her hand from the original pose to make it look more realistic. I modge podged her to the right side of the wood and then finished coloring in the lamppost and sign.

For the finishing touches, I used a piece of metal tape for one side of the lamp post and I went back over it several times with a wet brush and  a black gelato. I also glued down one of my vintage trinkets from prima- the lightbulb!  Last I laid down the letters. A mix of glitter thickers that I went over with Tim Holtz distress ink in barn door, and sticker letters that I traced with a white gelly roll pen. I went back with more stickles in christmas red and copper, then added a few enamel dots. I went back over the white areas with another coat of gesso just to make the image look cleaner, then heated well to dry! 


Well that's about it for today. I hope you have enjoyed my share. It took me several evenings to get it done but I am very pleased with the outcome and I'm off to mail it to my sis tomorrow morning!! I have several more ideas and projects in the works...I hope to be able to share them with you soon! I am looking forward to more creative time this week in between work, cooking, cleaning, and walks with hubby. Enjoy your week & until next time, Peace Yall~

Thursday, August 23, 2012

{Star Quality} with BG 'Out of Print'


Hi everyone! I am here today to share a very special layout I did this month using one of my favorite paper lines, Basic Grey, the 'Out of Print' collection. This is my last post this month for my LSS, Scrapping Frenzy. I think the name of this line is really very fitting since I swear I own probably every sheet in double but I can't seem to get enough of it when I see it I always buy more! LOL! So now you know why it's called 'out of print'!! Another special thing about this layout is that I used a very old photo of my Meemaw sitting on Orange Street pier in Fairhope, Alabama. I love this photo and the expression on her face, even though I didn't know her back then it really shows her grace and personality!! I knew it would be perfect for the type of layout I was wanting to do. So, here's a peek of the whole thing:

 To start the layering under my photo, I first matted it with one side of the BG paper and distressed the edges, then inked that. Under that I layered a piece of black cardstock to make the photo 'pop' off the page. I didn't want alot of dark colors going on but I knew I would have to tie in the black somehow into other elements of the page so I used a black paper flower, the black cut out words from the Carte Bella paper, and the black also came in on the Echo park paper with the film reels.

This photo was a sneaky-peek I took with instagram! I love that app, just need a figure out a cheap way to order some of my prints from them that will be printed square!!

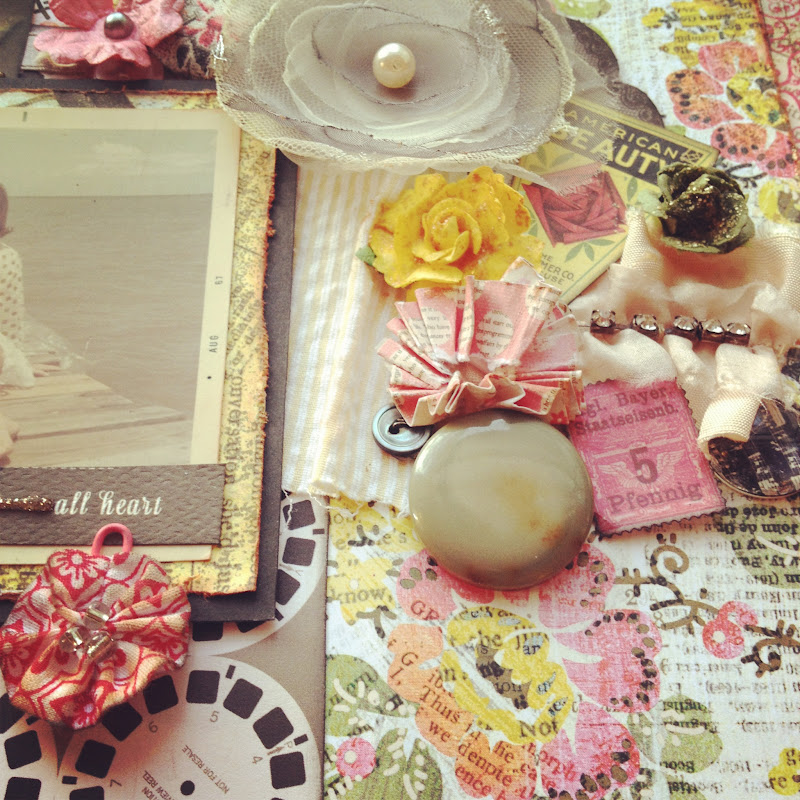
I would have to say my favorite thing about scrapping is 'building' my cluster, to me it's the best part about working on a page, digging through your stash and combining just the perfect mix of embellishments to get the look you want. For this cluster, I started off with a grey tulle flower from Webster's pages 'Florettes' then I added some color- drawing most of my color scheme from the flower paper behind the cluster. I used the yellow, pink, and pale green to complement the grey flower and off course topped it off with some stickles and pearls! My fav :D !!

For the title, I used some Tim Holtz type-writer looking salvage stickers to add to the vintage look. I underlined each one with stickles in 'platinum'.


And this is my favorite shot! The light was really great in the window when I snapped this one :)

 Well, that is all for today. If you don't already have this line, Basic Grey 'Out of Print' stop by the store today and get some! It is really so versatile and by far probably one of my favorite paper collections. Until next time my scrappy gal pals~ Peace Y'all~VV

Supplies used: Basic Grey 'Out of Print'- storyteller and , Echo Park 'Note to Self' 6x6 papers, Black cardstock by Bazzil, Colorbox pigment inks in blush, lipstick, and black. Smooch Spritz in 'Pralines and Cream', Tim Holtz distress stickles- 'dried marigold' and 'scattered straw' also Glitz stickles in 'platinum'. Webster's pages Florettes-grey tulle flower, Queen &Co twine-brown/white and yellow/white. Carte Bella 'life is beautiful' word sentiments. Crate paper cardstock cutouts-American Beauty and stamp, Sticky Thumb pop dots, paper flowers/roses- Prima and Recollections, pearls-Michael's, vintage buttons, rhinestone ruffle- Prima, Tim Holtz salvage stickers 'crowded attic'. Pier 1 paperclip flower, vintage buttons, cardboard piece and fabric from my stash.


Friday, December 30, 2011

tender moments. {stuck?! sketches 12/15 challenge}

hi everyone. I am feeling very accomplished today because not only did I get caught up a bit at the store today but I also was able to return/exchange some items J picked out for me at Michael's AND I also managed to finish this layout tonight in just under 2 hours! Let's face it...he did pretty well on all my xmas gifts actually, but in telling him I wanted lots of T!m Holtz stuff, he coincidentally got 2 things that I already have. It's cool though, cause I was able to switch them out for much needed refills on adhesive, a new T!m Holtz paper distresser, and a few sheets of basic grey paper. Why oh WHY don't they just carry the paper packs?! I mean seriously... you'll go in there sometimes and see a few sheets here and there of different lines, but never any complete BG collection packs. I am starting to become a paper snob I guess and I am obsessed with all their new lines right now. 

Ok, on to the challenge! I am submitting this LO for the Stuck?! Sketches Dec. 15th challenge.
This was the original sketch:
                                            

and this is what I came up with:  picture with flash
 picture without a flash...you can't see the colors as well but you get a better idea of the textures going on.
 another overview of the entire LO. for the basis of my page I used corrugate cardboard leftover from some packaging and on top of that I added 2 different patterned papers and then of course lots of embellies!!
 close up of the glass-slide title I did. used some sticker letters, stuck them altogether, used redline to tape them to the back of a glass slide. Sprayed over letters with smooch spritz in gold glow and caramel mocha for that aged look. then topped it with another glass slide and some gold foil metal tape. I liked the look of leaving the ends unfinished, so I did. the other part of the title is some pink rub ons.
 for the flower and hearts cluster, I used several Prima flowers that I sprayed and inked along with some flower stickers I had in my stash. To make them all kind of go together I funked them up with lots of TH distress stain in vintage photo and smooch spritz in gold glow and vanilla shimmer.

 Another close up of the top of the LO, foil stamped chipboard covered in TH distress stain.
 A side view: and my favorite view of the whole LO...here at the bottom.

I think it's so important to document these special moments. Especially for me, no longer having my Peepaw around, it's photos like these that really capture his kind, sweet spirit and the best of him, which is how I will always remember him. This was the first time I think he got to hold Ezra, technically his step-great-grandson. It was just an awesome moment, you can see little Ez just looking up at the twinkling in Peepaw's eye. <3
Well that is it for tonite folks! I really need to get to bed...early shift tomorrow. 
Until next time, peace y'all~VV

Supplies List:
12x 12 corrugated cardboard from scrapbook packaging
long paper strip-K&Company 'Jubilee Pink Postage'
square text paper- T!m Holtz Ideaology 'Lost and Found' paper stash
T!m Holtz distress stain in vintage photo
T!m Holtz paper distresser tool
clear/velluim ivory lace paper- Anna Griffin
flowers-Prima 'brown' and 'north country' collection
beige crystal heart- Prima 'say it with crystals'
crinkled paper sticker- Pebbles
glass slides/foil metal tape- Oriental Trading Co.
Smooch Spritz-caramel mocha, vanilla shimmer, and gold glow
foil-stamped chipboard sentiments- 'The sweet life' by colorbok
wooden heart- Pink Paislee woodshop letters
red rose enamel embellishment- Purple Pumpkin Crafts
pink rub-on letters Me&My Big Ideas
heart stickers, vintage buttons& H letter sticker- my stash
adhesives used: redline tape, pop dots, glue stick, tape runner
& Creative Memories frosted splits


Monday, December 12, 2011

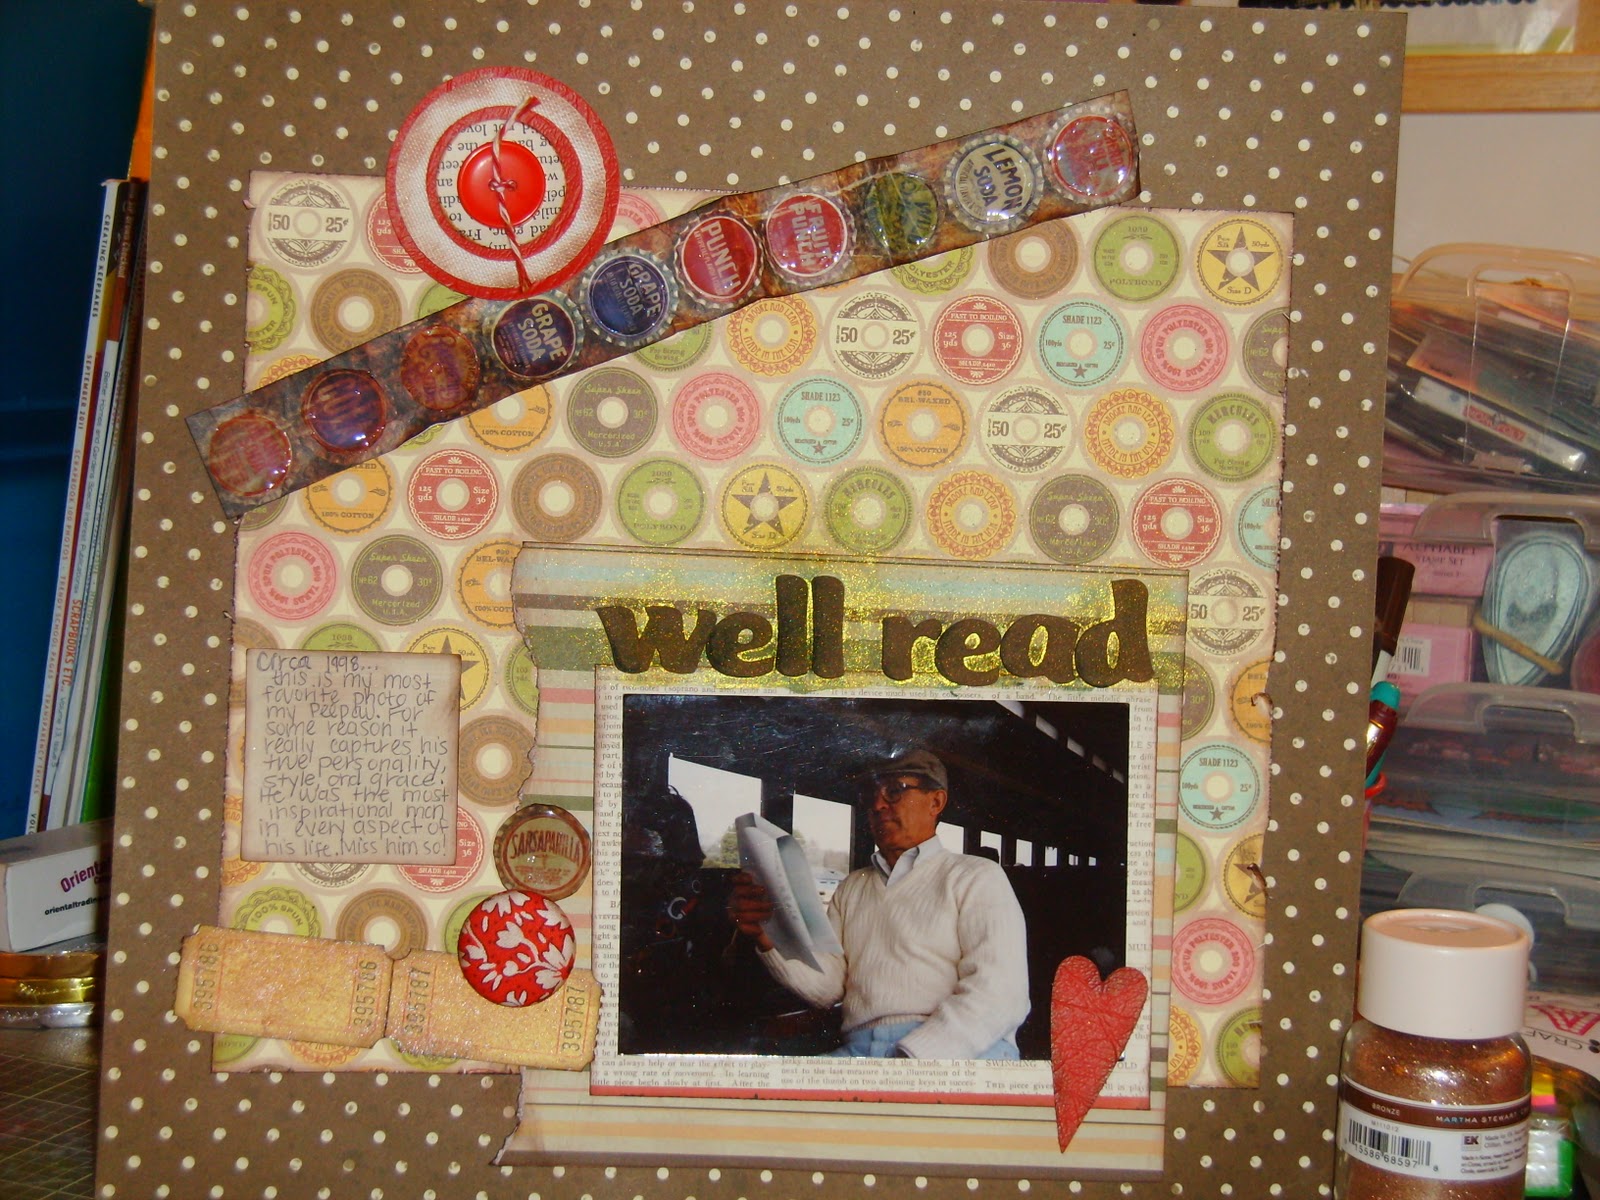
he was very well read. {artful delight december sketch challenge}

I think this is the first time ever I've had 2 blog posts in one day! Although I wasn't super productive, I did manage to finish the LO I started the other night for the sketch challenge over at Artful Delight. I loosely used the sketch as a guide,  usually I stick pretty close to it, but this time I added a few more elements and also did a less-girly take on it considering the picture I used. Here is the sketch:


Here is my take on this sketch, like I said, keep in mind I was trying to do a less girly theme, and I ended up adding some more stuff to it. I used several different lines of paper that really seemed to mesh well together surprisingly. Here are some pictures:


 another full shot of this very circle-themed LO:


okay, here's what you've been waiting for, the close ups! 
 a close up of the wrinkling/distressing I did to the bottle cap paper. Tried to make it stand out more on the page.

 here you can see the adorable red vinyl heart from Purple Pumpkin as well as a med red pattern button.
 another good close ups of some more PP goodies, on the yellow tickets I inked them first with a dark brown cat eye, then generously sprayed them with smooch spritz in caramel mocha. I really like how they turned out. I also lightly inked the fabric button to make the white on it 'less white'. 
 I love this close up, cause the layers on this red button are just perfect for this LO...the red vinyl along with the word paper are a great combo!! yes, another great handmade embellishment from PP:)
 the journal block is a 'sticky scrap note'
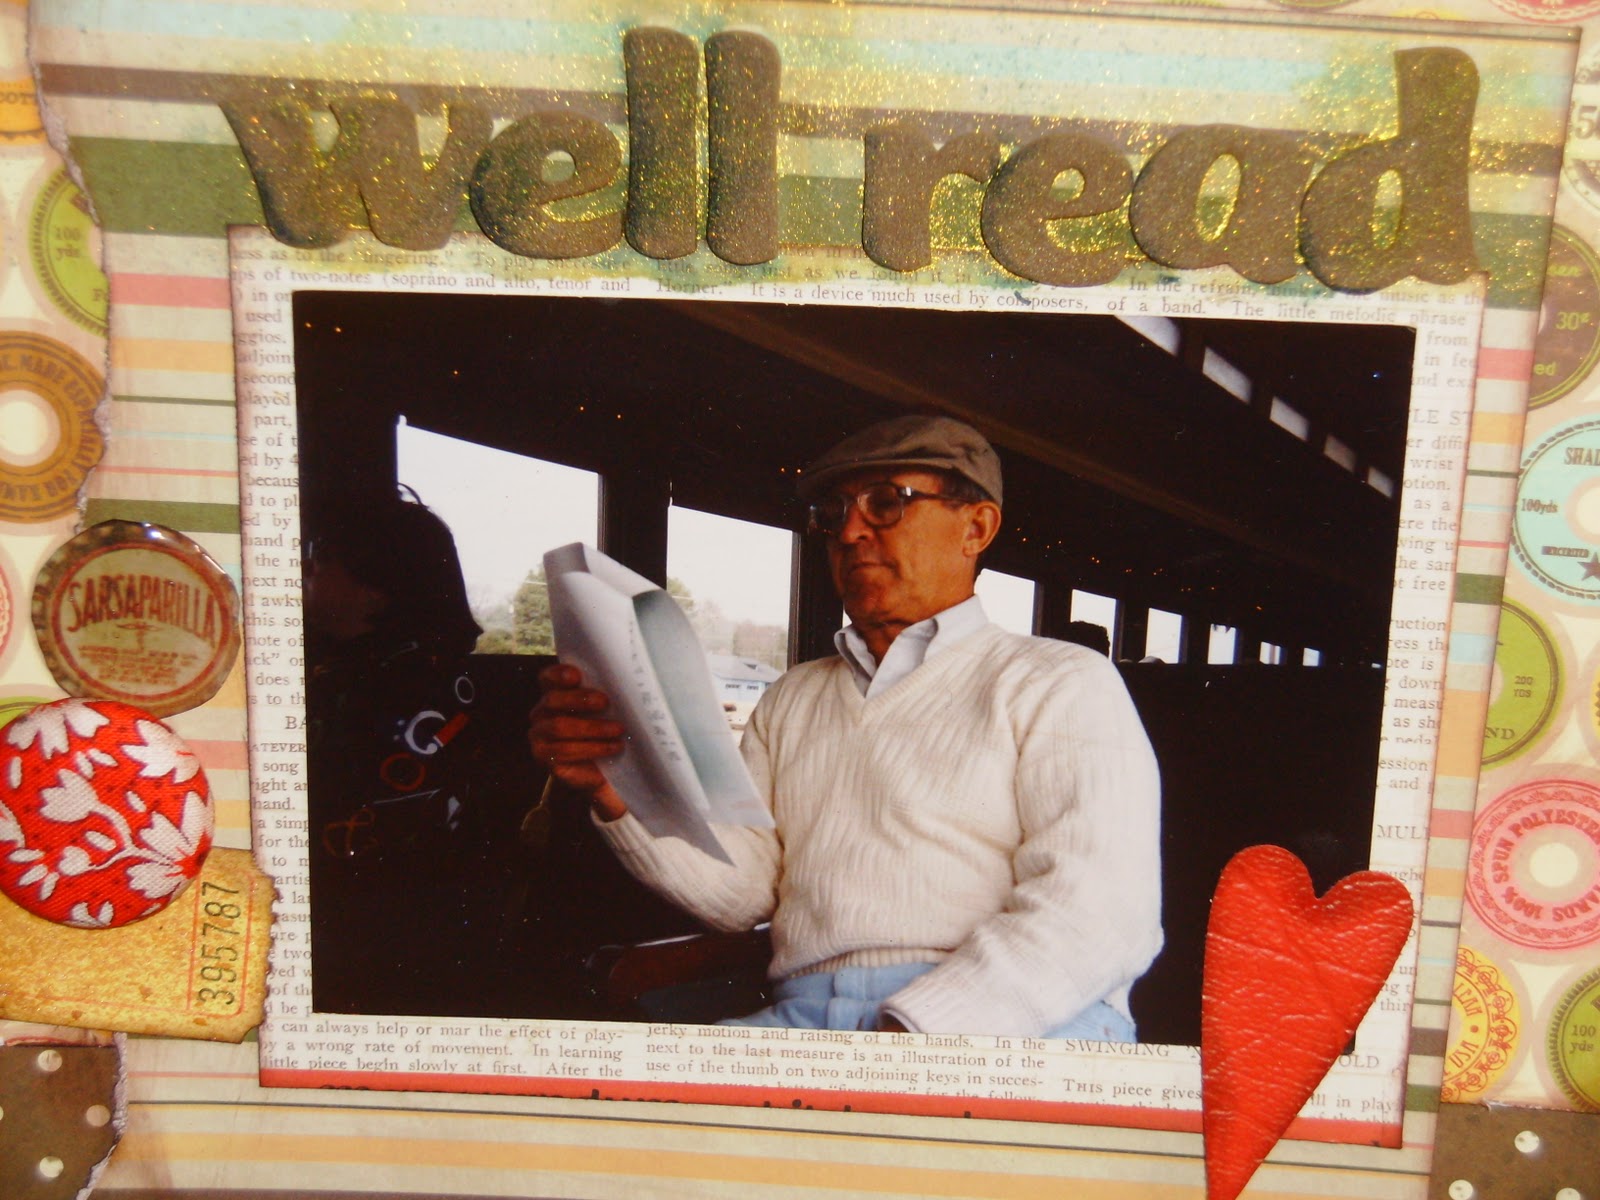
 and yes, a good zoom in of my absolute FAV picture of my Peepaw ;) still miss him so much these days!

I am submitting this for the December sketch challenge over at Artful Delight, and also I will be sharing it on the PP facebook page! Ok, it's getting pretty late here, guess I better start winding down for bed, it's back to work tomorrow for me! Until next time, peace y'all~ VV

Supplies List:
paper matting photo- 'memorandum white board' lilybee designs by Kristen Young
striped paper- 'be my neighbor' collection Oriental Trading Co.
vintage circle paper / brown dot paper- '6 bean soup' and 'barley pearls' collection  by jillibean soup
dark brown 'thickers'  ":Giggles" by American crafts
journaling block- scrap pads by Studio Calico
bottle cap paper strip- Tim Holtz 'lost and found' paper stash collection
 Tim Holtz distress ink pad in tea dye
Colorbox chalk ink in dark brown
Smooch Spritz in caramel mocha & gold glow
Glossy accents/ liquid glass
glue stick and large glue dots
craft knife
Purple Pumpkin embellishments:
yellow tickets
small red vinyl heart
med red pattern button
large layered red and cream circle button


Wednesday, December 7, 2011

it's just us, girl. {frosted designs sketch along tues #29}

Good evening, night owls. if you're like me the nighttime is the best time to scrap and get the creative juices flowing! I have been off for a day or two, and finally got at least one half of the house decorated, some gifts wrapped, grocery shopping for the week done, and even a little cleaning! I figured I would reward myself with some quality time in the craft room!! I swear it feels like it's been ages since I posted on here, even though it was less than 2 weeks ago. It also feels like it's been ages since I did a real LO! I have been so busy lately I haven't been able to keep up with all the awesome challenges going on, but I think I might be back in the swing of things! I managed to spend about 2.5 hrs in the craft room tonight and get this LO done for the Frosted Designs Sketch Along Tuesdays Challenge #29. I am really happy with the way it turned out! Not only did I get to make a banner for the first time ever on a page, but I got to use some of my new paper and awesome handmade embellishments from Purple Pumpkin. I have been drooling over their stuff for months and was finally able to order some things in the last sale of the year a few weeks ago! So this is my first LO ever using their stuff! So exciting because each piece is really unique and adds just that bit of texture and quirkiness to a page that I really really like. So here goes, this was the original sketch:

And this is what I came up with:

 I really like the muted colors in this LO, it makes the photos really stand out. Of course these are 2 of my favorite shots, me and my little niece Zoe Blythe on Easter this year. She is a such a good natured baby, I swear when I have kids one day soon that they all have her temperament! The Purple Pumpkin large vintage girl button and taupe flowered button really add some great visual interest. My most favorite part was making the banner, out of scraps of the same patterned paper I used at the top for the circles and some fuzzy dyed twine I had in my ribbon box. It's really simple to do, and I think the banner really adds a bit of whimsy and fun to this super cute, girly page. Here are some closies:

 Here you can see the title, which I did with some white K& Company letters that I inked and sprayed with smooch spritz, also I used a masking tape sticker which I wrote on for the first part of the title.
 A good shot of the banner and the dimension it adds to the page!
 Close up of the GORGE purple pumpkin taupe med fabric button, I LOVE LOVE everything I bought from them, will def. order more at the next sale in January!
 And of course, we have to have a good closie of the most adorable vintage girl xl fabric button, next to a prima flower. I think it's the perfect combo!! 

I had so much fun digging through all my new goodies to make this page....still so much scrapping and fun projects to do and so little time these days. Oh well, back to work in the am and a busy weekend ahead. Since I'm on day shift though this weekend I only have to work 10-6 for the next 3 days, then lots of fun stuff for 2 days! I hope I can dedicate at least another night or two to the craft room, I love it so much and it really just makes me happy and relaxed, what can I say? It's ME time. 
Until next time my fellow night owls~VV

Supplies List:
background paper- Pebbles paper 'Fresh Goods' collection, "Simple Joys"
pink polka dot paper- Me & My Big Ideas paper pad
smaller circle and banner- Basic Grey 'Out of Print' collection, "Giclee"
Pebbles Co, masking tape stickers
Prima flowers 'Love Note' collection, "Madeline"
white sticker letters- K&Company
Zig fine tip permanent marker in brown
Smooch Spritz in 'Gold Glow'
Colorbox chalk ink in 'Chestnut'
pearl brads & vintage pink buttons
Purple Pumpkin items:
large scalloped pink flower circle
XL Vintage Girl fabric button
med taupe flower fabric button
yellow tickets


Saturday, October 29, 2011

wedded bliss: frosted designs Tuesday sketch challenge #26

Happy Saturday everyone! I am enjoying an entire day at home today...which is so great considering I've been pretty busy lately. Going to grill out tonite for the Auburn game and probably carve some pumpkins! Before all of that I have a little cleaning to do and grocery shopping. I managed to finish my LO for the Tuesday Sketch Challenge #26 at Frosted Designs last night. I took pics and stuff but it was too late to update so  I wanted to go ahead and share it with yall today! 
If you haven't already entered it ends on Oct 30th!!
This was the sketch:

This is what I came up with:


 Here are some closies: As you can see, I stayed pretty true to the sketch and just added a few extra elements to the left side of the picture frame. I layered several different elements to give texture. I like how the color palette is unexpected too, but I think it goes well with the photo and makes my favorite picture of Crystal and Chris on their wedding day really stand out!

 Here is a close up of the different paper flowers, vintage buttons and newspaper, vinyl elements, brads, and rub ons I used. I also really like how the clear frame over the picture turned out. 


 I plan on putting this page right next to the last LO I did  using some of the other wedding photos. I really like the way they both turned out and think they will look great next to eachother! 


overall, I'm really happy with these 2 LOs and excited to submit this one for the frosted designs challenge! ok... I've been playing on here way to long I've gotta get going on this cleaning and shopping for tonite! Have a wicked weekend! Until next time~ VV

Supply List:
Basic Grey Paper (1/2 sheet 12x12) 'Origins' Collection- 'mud mask'
Green vintage flower paper (background) -The Paper Studio
Prima flowers 'love note' collection
No. 9 Essentials floral embellishments
Que Sera Sera Acetate die cut clear frame- K&Company
Black and Cream cardstock
Vinyl flowers and tag- American Crafts 'Townhouse' collection
Recollections 3D embellishments
We R Memory Keepers embossed die cut 'Smell the flowers'
pearl brads
vintage buttons and newspaper
black tulle
white stick on letters- K&Company
'Love' Rub Ons- The Paper Studio
Tim Holtz Distress Stickles 'brick'
Colorbox Ink- Black and Lipstick