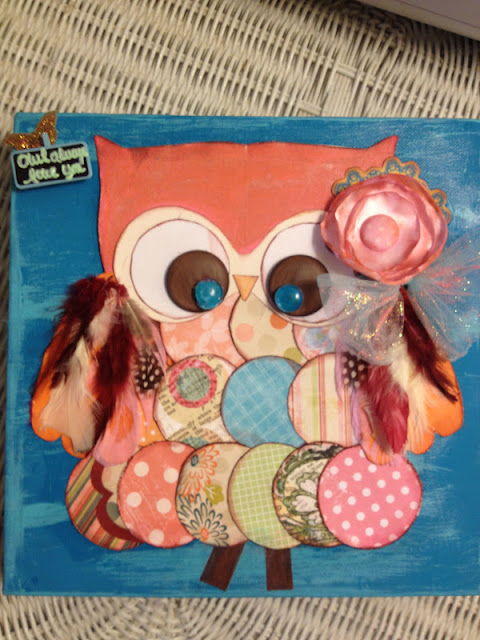
Happy Friday!! (the 13th OOH spooky!) I am here to share with you a special project that I did this month for Scrapping Frenzy! I used some of my leftover scraps of patterned paper, a little paint, a canvas, and just a little creativity! I had originally thought it would be kind of challenging to come up with something to make, and then I just started browsing through my scrapbook magazines. In the newest issue of Scrapbooks, Etc. this project was featured in the back! So I can't take full credit for the idea, but I did totally make it my own and add a few things! This little art piece would make a great gift for a girl's birthday and that is what I plan on doing with it, for my little niece, Zoe!
To start, this is the page that inspired me in the magazine:
So I started sorting through my scraps and I mixed and matched several lines of paper to come up with quite a colorful palette. I first cut out all the circles, distressed and inked them, then hand drew the eyes, and the top of the head with ears. I glued the top piece down first to a thicker piece of cardstock, then started layering my circles. I moved them around quite a bit until I was happy with the color arrangement. Last I glued down the eye piece on top of the circles and added a small triangle for the nose. This is what it looked like before embellishments:
The last pieces I did were the wings, which I hand drew basing them on the thicker brown wings from the magazine page. I glued them on top of the circles, then started layering on some feathers. I thought it would be a nice addition of more texture so I picked maroon, cream, and natural looking feathers and mixed them together to come up with the 'wings'. I first tried using glossy accents to adhere them, which didn't work, then a tape runner, and in the end I figured out that large glue dots worked best!! This is how it turned out after I added everything!!
I really wanted it to be colorful, so I chose 2 different colors of blue for my canvas instead of grey or white. also I layered some large dew drops and xl brown buttons for eyes along with a tulle bow to the flower. I tied the bow by hand and used my fingers to smear some stickles in 'tropical tangerine' over it to add some sparkle!
To the otherside I added a grungeboard butterfly covered with stickles and a mini chalkboard. I used Tim Holtz distress markers in 'picket fence' to write on the chalkboard but it didn't come out too clearly so I went over it with some old school puff paint!! LOL
So here is another shot of the whole thing! I am really happy with the end result, even after all my stressing :D and I can't wait to give it to my little niece!!
So I hope I have inspired you today to step out of your scrapbooking comfort zone of layouts and cards and make something really special for your family or friends! Scrapbooking supplies can always be used for something great, like wall art!! I am taking a personal day today to get ready for a DT meeting and private crop at Scrapping Frenzy, can't wait to see my friends and get the creative mojo flowing again! I'll be back soon to share some more lovely LO's from tonite (depending on how much I get done, LOL)!!
Until next time, Peace y'all~ VV
Supplies: cream, white, pink, orange, and brown cardstock- Bazzil, misc. patterned papers including; Basic Grey 'Out of Print', Bo Bunny 'a Gift of Love', American Crafts 'Neopolitan' line, and Crate paper. Clearsnap Smooch Spritz in 'caramel mocha'. Colorbox fluid chalk inks- creamy brown, pumpkin pie, Ranger Stickles 'tropical tangerine', paper doily- Crate paper, Tim Holtz distress markers 'picket fence' and 'antique linen'. Large clear dew drops by The Robin's Nest,Tim Holtz paper distressing tool, Tim Holtz grungeboard, turquoise-colored tulle, large brown antique buttons, mini chalkboard, misc. feathers-from stash. large pink flower- purple pumpkin crafts, Modge Podge, Folk Art Acrylic paint in 'calypso blue' and 'turquoise', mint colored puff paint, foam brushes, and square canvas from art supply store.


No comments:
Post a Comment